Showing posts with label Gluten-free. Show all posts

Wednesday, January 2, 2013

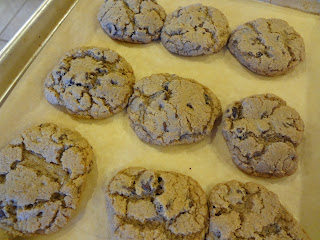
Gluten Free "Neiman Markus" Cookies


Okay. So, I'm about to share with you just how far removed from civilization I've been. I have a cookie recipe, apparently from someone named Neiman Marcus, and until today, I had no idea who or what that was.

*Gasp*

Neiman Marcus is a store that carries designer labels. I googled them. They carry clothes that are usually only seen on runway models. Clothes that normal women roll their eyes at and wonder, "Did she not notice her striped shirt and checkered pants do not go with that paisley jacket?" And that those hideous make-your-eyes-cross patterns sell for $1,000 a piece? And we (I'm inserting myself here) normal women notice that these same models look like they've never eaten a cookie a day in their lives? And then, some clueless woman who thinks Google is a Godsend, finds that not only does Neiman Marcus carry make-you-dizzy outfits, but the store also sells cookies!?!

Be still my heart. Finally. A store that caters to the blind and the hungry. Now, that's a place I can get behind.

Just as long as I don't have to wear paisley with my striped wool socks. ☺

Gluten-free "Neiman Marcus" Chocolate Chip Cookies


~The Players~
 
1 cup unsalted butter, room temperature
2 cups brown sugar
6 Tb. granulated sugar
2 eggs
4 t. pure vanilla extract
1 t. baking soda
1 t. baking powder
1 t. sea salt
3-1/2 cups gluten-free cookie flour blend (*see below)
1-1/2 t. xanthan gum
1 Tb. instant espresso powder
2 cups chocolate chips


In a large mixing bowl, cream the butter and sugars together until fluffy.


Add the eggs and vanilla and mix well.
 
 
In a smaller bowl, whisk together the baking soda, baking powder, sea salt, flour, xanthan gum, and the espresso powder. Mix the dry ingredients into the butter mixture until thoroughly combined.
 
 
Stir in the chocolate chips.
 
 
Drop by large spoonfuls (or cookie scoop) onto parchment lined cookie sheets.
 
 
Bake @ 375F. for 10-12 minutes. Remove from oven and allow to cool slightly on the cookie sheet before moving to cooling rack.
 
~GF Cookie Blend Flour~
 
2 cups fine-ground brown rice flour
2 cups fine-ground white rice flour
1-1/3 cups potato starch (not potato flour)
2/3 cup tapioca starch/flour
 
Mix ingredients together. Store in a tightly covered container in the refrigerator until used.
 
The flour recipe comes from Mary Capone, contributing writer/chef for Living Without magazine.
 
Enjoy!


Tuesday, October 9, 2012

Gluten-free Spiced Oatmeal Cookies


Now that the weather has cooled, it's time to get back in the kitchen and start baking again. Baking has taken on a new set of challenges since my gluten allergy was diagnosed, but it is still one of my favorite things to do. One of the cookies that I have loved since I was a kid, is oatmeal cookies with raisins and cinnamon. Whenever I think of fall baking, I can't help but think of oatmeal cookies. My kids say they smell like an expensive candle.

I think they smell like Autumn.

And after a little tweaking of an old family recipe, I can do more than just smell them.

I can eat them too!☺

~Spiced Oatmeal Cookies~
 
~The Players~
*use organic, if possible*
 
1/2 cup unsalted butter, softened
1/2 cup organic shortening (Tropical Traditions or Spectrum~but not Crisco!)
1 cup packed light brown sugar
1/2 cup white sugar
2 eggs, lightly beaten
1 t. pure vanilla extract
1-1/2 cups *gluten-free flour blend (*see below)
3/4 t. xanthan gum
1 t. baking soda
1 t. ground cinnamon
1/2 t. ground cloves
1/2 t. sea salt
3 cups gluten-free rolled oats (I use Bob's Redmill)
1 cup organic raisins
1/2 cup chopped walnuts
 
Preheat oven to 350F.
 
 
In a large bowl, cream together the butter and shortening. Add the sugars and mix well. With the mixer still running on low, add the eggs and vanilla; mix until smooth, scraping down the sides of the bowl as necessary.
 
 
In a separate bowl, sift together the flour blend, baking soda, cinnamon, cloves, and salt. Slowly add the flour mixture to the butter/sugar mix, scraping the sides of the bowl as needed.
 

Stir in the raisins and nuts until well incorporated.


Drop by rounded teaspoon onto a parchment lined cookie sheet or a baking stone. (LOVE my baking stone!) Bake for 10-12 minutes until a light golden brown. (I found with a baking sheet I needed the full 12 minutes.) Do not over bake! Let them cool on the cookie sheet/baking stone for several minutes before removing and placing on a wire rack.
 
 
Pour yourself a glass of cold milk (or coffee!), grab a favorite book, and enjoy all that Autumn has to offer.

Especially the cookies.☺
 
*Gluten-free flour blend: 1 cup brown or white rice flour
2/3 cup sorghum flour
1/3 cup tapioca flour/starch
 
Sift together. Store in a sealed container.
 
Makes 2 cups GF flour.

Tuesday, September 25, 2012

Decadent Chocolate Mocha Pudding

In the past week, I've watched the sun rise and set...all from the back end of a cow. I thought with the birth of Maggie Moo, my days facing south were over. But, since the whole purpose of a having a Jersey was for the liquid white gold she would produce, I've spent more time hunched over a cow (and under) than standing upright.

While researching "how to milk" articles, I stumbled across one common statement. Cow's like to be milked.

Sure they do.

Someone forgot to inform Tilly of this little known-only-to-delusional-farmers-fact.

I don't know if Tilly enjoys the slurping sound of a metal machine or not, but I know that she does not enjoy standing in a stanchion. She does not enjoy having her udders washed, even though the water is warm, nor does she like the towel buffing I give her after her mini-bath. The whole process tends to loosen Tilly's bowels and make our usually mild mannered milk cow a little testy. And there never seems to be enough molasses covered grain to soften her mood or stop up her back end.

So, why do I do this twice a day?

Two words. Pud-ding. With all the milk we've been getting, I've only had one thing on my mind. Pudding. And because I'm a sleep-deprived milk-maid with a bruised and slightly smelly ego, it must be chocolate with a coffee twist.

And that is why I'll be watching the sun rise again tomorrow.

From the underside of a somewhat cranky cow.


~Chocolate Pudding~

~The players~
 
2 large egg yolks
1/2 cup sugar
3 Tb. cornstarch
2 cups whole milk
1 cup half & half, or light cream
5 oz. bittersweet chocolate (I like Trader Joe's 70%)
1 Tb. instant espresso powder
pinch of salt
1 Tb. pure vanilla extract
 
In a large bowl, whisk together the egg yolks, sugar and cornstarch. They won't whisk smoothly, but that's okay.


Combine the milk, cream or half & half, chocolate, espresso powder, and salt in a saucepan over medium heat and stir until the chocolate melts. Slowly pour the chocolate mixture in the egg mixture, whisking constantly. (You may need a little help here.)


Pour back into the saucepan and place back on medium heat. Continue to whisk until the lumps are gone. Cook until thick, 12-15 minutes. Remove from heat and pour back into bowl, or if you like, individual dessert cups/ramekins. Cover with plastic wrap and refrigerate until set, about 2 hours.
 
Serve with freshly whipped cream.

Thursday, August 30, 2012

Time-Saving Potato Brunch Bake

Please excuse the flourescent photo~someone forgot to turn off the flash.

Sometimes life can be complicated. Cows don't calve when they're supposed to (still waiting), children refuse to clean their rooms when asked (and instead draw you a very nice picture~as a  gift), appointments get scheduled at the most inopportune times (who PURPOSEFULLY makes a well-child checkup at 8:30a.m. when it takes 30 minutes to get to town?), etc...Sometimes, a gal just needs a break.

Cooking everything from scratch takes dedication. It takes effort. And it takes time. And sometimes, there just isn't enough time to go around. Those are the moments where something has to give.

Because Mom is just about to break.

This recipe cheats a little on the whole food concept. You could use cooked, diced or shredded potatoes from your own garden (which would be fabulous), but since we're talking about saving time, I used tater tots. Why tater tots?

Because they are gluten-free.

And sometimes, that's good enough for me.☺

~The Players~
 
2 t. olive oil
2 c. Colby cheese, shredded
2 c. Monterey Jack cheese, shredded (mix the 2 cheeses together)
1-1/2 pkg. (32 oz.) Ore-Ida Tater Tots (these are GF, I don't know about other brands)
8 oz. cream cheese, softened
12 eggs, whisked
1/2 t. black pepper
8 oz. thinly sliced deli ham, chopped (or 1 lb. bulk sausage, cooked and drained)
1 small sweet onion, chopped
1 sweet red pepper, diced
1 c. diced tomatoes
2 Tb. chopped chives
 
Preheat oven to 450F. Lightly brush an 9" x 13" casserole pan with 1 t. olive oil. (I used a Pampered Chef medium bar pan.) Lay tater tots in a single layer in pan.
 

Take pictures of your goofy adult daughters "helping" in the kitchen.

 
Sprinkle 2 cups of cheese over tots and bake for 13-15 minutes, or until they start to brown.
 
Using a mixer, beat cream cheese and eggs together. (They may be a little lumpy.) Add black pepper.
 
 
In a small pan, saute onions and ham in remaining olive oil until onions are soft. Stir into egg mixture.
 
Pour egg/ham mix over tater tots.


Return to oven and bake 8 minutes, or until eggs are set in the middle. Remove from oven and add remaining cheese, tomatoes, and chives. Sprinkle with more ground pepper, if desired.
 
 
Enjoy!


Monday, July 30, 2012

Chickpea Fritters and a New Giveaway Winner


It's not very often that I eat something fried, but when I do it has to be worth my time and effort. This is the time of year that I would be thinking about making Zucchini Fritters, but since the garden is slow on production, I improvised.

With chickpeas.

Chickpeas, or garbanzo beans, are a staple in my house. I love them in hummus, salads, chili, and now fritters. My youngest granddaughter has been known to eat an entire cup of chickpeas in one sitting. And she's only 16 months old! (She must get her good taste in beans from yours truly.☺)Low in fat, but high in fiber and folic acid, chickpeas are a great way to go meatless without sacrificing protein. They are also incredibly inexpensive, which makes this a very frugal AND gluten-free dish.☺

~The Players~

1 cup gluten-free flour blend (*see below for blend)
1-1/2 t. baking powder
1/2 t. sea salt
1 egg, beaten
3/4 cup milk (can use unsweetened almond, rice, or hemp milk, if desired)
1 bunch green onions, chopped
1/2 cup chopped sweet onion
1-2/3 cups chickpeas, rinsed and drained 
3 Tb. chopped fresh cilantro
3 Tb. chopped fresh parsley
sea salt & ground pepper, to taste
sunflower oil, for frying

*Gluten-free flour blend: 1 cup brown rice flour
2/3 cup sorghum flour
1/3 cup tapioca flour/starch

Sift flour, baking powder, and salt into a mixing bowl and make a well in the center. Add the egg and milk and stir into the flour. Use a whisk to make a smooth batter.


Stir in the onions, chickpeas, cilantro, and parsley.


Heat the oil in a large, heavy skillet. (Cast iron is great!) Add the batter in approximately 1/4 cup sized proportions. Sprinkle with salt & pepper.


Cook for 3-4 minutes; carefully flip the fritter over and cook until golden brown, approximately 3 minutes.


Drain on paper towels. Keep warm while you fry the remaining fritters. Add more oil to the pan as needed.

Enjoy!

*This recipe was adapted from the cookbook, Gluten, Wheat, & Dairy Free.

Sooooooo....since I didn't hear from the first giveaway winner, I have a new winner of the Ball Blue Book of Preserving. Even though it's technically not blue any longer. Winner #2, courtesy of random.org is...
 
Carol Sue!

Congratulations Carol Sue! Please email your mailing address to kimberlyj9 @ live . com (no spaces) and I'll get your book right out to you!


Thursday, July 12, 2012

So Long Johnny. There's a New Salt in Town.


Once upon a time, I enjoyed a good barbecued steak. There were certain things I could count on when cooking that steak, such as; the beef was always grass-fed from our farm, it was always cooked until the cow had just stopped mooing, and the steak was always shared with someone special named Johnny. 

Those were the good ol' days.

When I found out about my food allergies, our way of barbecuing had to change. And so did my special partner. See Johnny was no good for me. Oh sure, he made me feel itchy and tingly all over, but he also caused an ache in my belly that would last for days. I loved him, but all he knew how to do was hurt. So I ended my lifetime love affair with Johnny. Cold turkey. I'm not saying it was easy or it happened overnight, but somewhere in the aftermath, something started to change. I realized that I didn't need to be in a relationship with an abusive seasoning full of soy, wheat, and random fillers. I needed the real deal.

The back of the Johnny's Seasoning Salt bottle says "Pure Magic." Then it lists the ingredients: salt, sugar, paprika, pepper, dehydrated garlic, soy sauce powder (made with soybeans, wheat, salt, and malto-dextrin), cellulose gel, and citric acid.

I wonder if the magic is in the genetically modified soybeans, the cellulose gel, or the malto-dextrin. (For the record, I looked up cellulose gel and was assured that it is vegan, so that's one less thing to worry about when barbecuing meat.☺)

This new relationship is so simple. There are no funky ingredients and you can name your bottle of salt whatever you like. I'm calling mine Steve. 

And I'm sure we'll live happily ever after...

Somebody forgot to add the pepper.

~ Steve Just Seasoned Salt ~

3 Tb. sea salt
2 Tb. garlic powder
1 Tb. onion powder
1 Tb. coarse black pepper
2 Tb. paprika
1 Tb. sugar
pinch of cayenne pepper

Mix together. Store in a dry covered container.

Enjoy!

~The End~


Monday, July 2, 2012

Cinnamon Spiced Granola


I'm not much of a cereal eater, but I do appreciate a good granola from time to time. Store-bought granola might be tasty, but have you ever stopped to read the labels on the box? While meandering down the cereal aisle, I decided to look for an acceptable alternative to homemade granola. Something that could take the place of our homemade in an emergency; did not contain gluten, and wasn't made with a bunch of genetically modified, processed ingredients.

After 30 minutes, I gave up.

Because I ran out of boxes to read.

Maybe I'm a granola snob, but I know what I like. I know what my kids like. And I know what won't make them sick in the long run. If we are going to eat healthy, whole foods 80% of the time, I would rather not waste our remaining 20% on crappy cereal that holds no nutritional value. 

Not when granola is so easy to make at home.

Our old stand-by granola has been Fruity-Coco-Nutty Granola. I've been making it for at least 10 years. Which means that it lost it's WOW factor back in 2003. Then we discovered Almond Joy Granola which turned into a "life is short, eat dessert first" kind of breakfast cereal. The Almond Joy Granola is perfect on ice cream, but not so perfect when you're trying to teach prepositional phrases to a bunch of wild chocolate junkies who can't seem to stay in their seats.

Thanks to "The Whole Life Nutrition Cookbook," we have a new stand-by breakfast cereal. With only a handful of ingredients that you probably already have on hand, this is economical, healthy, and just plain delicious. 

And did I mention nutritious? Save the 20% for the uncles, Ben & Jerry. They need a little love too.

~Cinnamon Spiced Granola~
(slightly adapted from "The Whole Life Nutrition Cookbook")

3 cups GF rolled oats, divided
1 c. chopped walnuts
1 c. chopped almonds
1 c. unsweetened coconut chips or flakes
1 Tb. cinnamon
1/2 t. nutmeg
1/4 t. ground cloves
1/4 t. ground ginger
1/4 t. sea salt
1/2 c. grade B pure maple syrup
1/2 c. melted coconut oil
1 t. vanilla

1. Preheat oven to 350F. 

2. Place 1-1/2 cups rolled oats in a food processor and pulse until oats are chopped up. This will add a little chunkiness to the granola. Pour the oats into a large bowl and add the whole oats. 

3. In the same processor bowl, add the walnuts and almonds. (Can use pecans or hazelnuts, if preferred.) Pulse until nuts are coarsely chopped. (It's faster to chop the nuts in the processor, but it's fine to chop them by hand.) Add the nuts to the oats. Add the spices and mix well.

4. In a small saucepan, melt the coconut oil, then measure out 1/2 cup. Pour any remaining oil back into your oil bucket or jar. (It will firm back up as it cools.) Pour the coconut oil into the oats. Add the maple syrup and vanilla. Using a wooden spoon, mix well, making sure that all the oats are covered with the wet ingredients.

5. Spread the mixture onto a broiler pan or a cookie sheet with sides. Bake for 10 minutes. Turn off the oven, but do not remove the granola from the oven. Leave it alone for 1 hour. (Trust me!) After an hour, remove from oven and finish cooling on the counter. Store in an airtight container for up to 2 weeks.

*Leaving the granola in the oven will allow the granola to dry without burning. When cool, the granola will be chunky like the store-bought, but without the soybean oil and wheat starch to hold it together. We usually add dried fruit to the granola after it is out of the oven. Some favorite additions are: chopped dried apples, dried cherries, dried mangoes, dried blueberries (my personal favorite), or raisins.

Sunday, May 27, 2012

Sunflower Muffins


If you've followed my blog for very long, you'll know that in January, my daytime life changed with the discovery of Banana Nut Muffins. Oh my. These are the nectar of the monkey gods, and a throne plate from which I will gladly bow to eat from for the rest of my life.

Then I did. Not for the rest of my life, but for the last 5 months these muffins have been a staple of my new gluten-free morning lifestyle.

But as life usually does, a monkey wrench was thrown into the mix. (Pun wasn't intended, but I left it there, so I guess now it's intended by default. And being too lazy to change it. Cause that's how I roll.)
I ran out of shelled walnuts. Yes, I could have shelled more, but operating a nut cracker under the influence of only 1 cup of coffee while wearing a bathrobe could be construed as a dangerous task. At least, that's what the warning label should say.

Then something wonderful happened.

My daughter went to a women's tea at our church where one of the door prizes was a cookbook called, "Gluten, Wheat, and Dairy Free." She didn't win it, but the lovely lady who did allowed my sweet girl to bring it home for me to peruse. And I did. Then I photo-copied half the book. I'm sure there is some copyright laws I may or may not have broken, but I was desperate for something new. Something different. Something that didn't involve dangerous kitchen equipment.

I must warn you though, these muffins are like sunshine in a cup. Or muffin tin. Or cupcake liner. They cause spontaneous smiling, and unintentional moaning. You should also know that Sunflower Muffins freeze well, so double the batch and save some for later.

By the way, I felt a little guilty about the whole copyright infringement thing, so I bought my own copy of the book. Just in case they were serious about their reserved rights...☺

~Sunflower Muffins~

~The Players~
*2-1/2 c. gluten-free flour blend (see my recipe below)
4 t. baking powder
1/2 t. xanthan gum
1 t. ground allspice
2/3 c. firmly packed light brown sugar
1/4 cup unsalted raw sunflower seeds
3 medium organic carrots, grated
zest and juice of 1 organic orange
2 eggs, beaten
2/3 c. unsweetened almond milk (can use regular milk if desired)
1/3 c. plus 2 Tb. sunflower oil
1 t. pure vanilla extract

Preheat oven to 400F. Place 12 baking cups into the muffin pan. (I LOVE silicone muffins cups!)


Sift the flour, baking powder, xanthan gum, and allspice into a large bowl. Stir in the sugar.

Add the carrots, 3 Tb. of the sunflower seeds, and the orange zest.


Lightly beat together the orange juice, eggs, almond milk, oil, and vanilla with a whisk.


Stir the wet mix into the dry ingredients, mixing to make a batter~it will be a little lumpy.


Spoon the batter into the baking cups and sprinkle with remaining sunflower seeds.


Bake in the oven for 20-25 minutes, or until golden brown and the centers are set. Serve warm.

*My gluten-free all-purpose flour blend is:
1 cup white or brown rice flour
2/3 cup sorghum flour
1/3 cup tapioca flour

Mix together and store in a sealed jar.

Enjoy!


Thursday, May 17, 2012

the day I forgot to read the label


Since going gluten-free, I've found it's not enough to assume that everyone understands what gluten-free means. Most people consider it a fad, like wearing bell bottoms, wooden clogs, or underwear on the outside of their clothing, thinking if they just wait long enough, this too shall pass. Those are choices (albeit, stupid ones if I'm being honest here) that will go away once the attention is off of them. But what if being gluten-free isn't a choice?

Recently, while visiting a local health food store, I found out how little people actually understand. There were a couple of gals handing out samples, touting the fact that these were gluten-free samples. Believing that these representatives of these particular companies knew what they were talking about, I sampled without reading the labels for myself.

Then I went to hell and back paying for my lack of attention to detail.


I've never in my whole life felt the kind of pain that I experienced that day. My Mister, who is a registered nurse, asked me what my pain number was. For the record, I've never fully understood rating pain in that way. If I go to the emergency room, it's bad. Period. But apparently, not all who visit the emergency room understand what constitutes an emergency. I did. For the first time in my life, I was a 10. Not a Bo Derek running-across-the-beach-with-my-braids-a-flappin' kind of 10, but the I-don't-care-if-Mr.-so-and-so-is-having-a-heart-attack-in-the-next-room-HELP-ME-FIRST kind of 10. I was literally minutes from heading to the hospital.


Here are a couple of guidelines that I am learning to follow:

1. If in doubt, go without. This has been a difficult one. I really wanted a caramel latte one day. The barista didn't know whether the caramel was gluten free or not. So I took a chance. Then I paid for it. In retrospect, I really didn't want the caramel latte that badly!

2. Wheat free does not mean that it's gluten-free. Wheat is only one of the grains that contains gluten. Others are rye, barley, triticale, semolina, kamut, graham, durum, faro, and spelt. Corn and oats are gluten free, but only if they are certified as such. Don't assume that they are without that label.

3. Call ahead. When dining out, it is important to stay away from restaurants that are clearly not gluten-free. Italian is an obvious one, but did you know that Asian food is not allergy friendly? It doesn't have to be breaded to contain gluten.

4. When dining out, always ask for food to be prepared without the sauce. Many restaurants will cater to special diets because they want your business. A happy customer is a repeat customer! And we usually bring friends when we're happy.☺

5. Food in a health food store does not mean that it's good for you. If you buy a processed, gluten-free cookie, it is still a processed cookie. Make it a treat, not a way of life.

6. Most recipes can be made gluten-free. My favorite "all-purpose" flour is:

1 cup white rice flour
2/3 cup sorghum flour
1/3 cup tapioca flour/starch

Sift together and store in an air-tight container. 

This resembles white flour the best. Brown rice flour can be substituted for the white and will pack more fiber into the recipe. (When baking with it, expect a darker appearance.)

Xanthan or guar gum helps to bind gluten-free baked goods together. The general rule of thumb is 1/2 teaspoon for each cup of flour used in cookies, cakes, muffins, and other quick breads and 1 teaspoon per cup of flour for yeasted breads. 

7. When entertaining, always ask your guests if they have any special diet restrictions. Before my food allergies took me down this path, I never thought to ask. Ever. When I was in grade school, buying a hot lunch was considered a treat. Most of us brought our own lunches. And most of us had the same thing; peanut butter and jelly sandwiches. If you were one of the lucky ones, your mom made them on white Wonderbread. (I was not one of the lucky ones. We usually had the dried out cheap store brand that was purchased 3/$1.00~how's that for dating myself?)

Those were the kids to target for a trade. 

What I wouldn't give for a Wonderbread P.B.&J. now.

On second thought...☺
  
So, the lesson here is to always read labels. It is to never assume that any person handing out samples at a store, recipes on a blog, or menus in a restaurant understands the true meaning of gluten-free. Never assume that a home you are visiting understands either. The lesson is to look out for yourself. To double check everything. And to get educated. This goes for any food allergy. And while mine may have not been life-threatening (Although, if those sample gals would've been standing before me, I could not in good conscience have guaranteed their safety!), there are people whose allergies can be deadly.

And it's better to err on the side of caution. Always.


Sunday, May 6, 2012

Gluten-free Mocha Brownies


Lately I've been stuck in a rut. Before my food allergies were discovered, I would look at recipes from all over the world wide web and feverishly write any recipe that caused my salivary glands to spring into action. Most of those recipes were filled with ingredients that I already had on hand. Sometimes I would find a gluten-free, vegetarian, vegan, or sugar-free recipe that would cause the same reaction. Once I had to go gluten-free (and mostly vegetarian), those recipes didn't appeal much to me anymore.

The other day all I could think about was a big, juicy, grilled hamburger. I wanted it all. The bun, the meat, and the mayonnaise. All of which are big no-no's. But I didn't care. I wanted it and I wanted it yesterday.

Then I touched the hamburger. That's all it took. Just touching the raw meat made my body go into an inflammatory response that caused my fingers to swell, head to ache, and joints to start hurting.

It took 2 entire days for the pain to go away.

It took another 2 for me to stop feeling sorry for myself.

Then something wonderful happened. I realized that I'm not the only one who deals with food allergies. I'm not the only one who feels sad about the things I can no longer have. And I'm not the only one who is having to learn to cook in a whole new way. There are many others. And they have written cookbooks. Beautiful cookbooks. Cookbooks that kick my glands into overdrive. And sometimes, someone else wins one of these cookbooks at a women's luncheon and allows one of the loser's to take her cookbook home so she doesn't feel like such a loser anymore. And sometimes that loser finds a recipe that causes her to jump out of her rut and get excited about cooking again.

And because it's chocolate, life has never been sweeter.

~Mocha Brownies~
(adapted from The Gluten, Wheat, and Dairy-free Cookbook)

~The Players~

12 Tb. unsalted butter
11 oz. good-quality bittersweet chocolate (70% cacao)
2 t. instant espresso powder
2 t. vanilla extract
2 cups almond meal 
1-1/2 c. organic sugar
8 eggs, separated
confectioner's sugar and cocoa powder, to decorate (optional)

Preheat oven to 350F. Grease an 11 x 13 glass pan. Line the bottom with parchment paper.

Melt the chocolate and butter in a heatproof bowl placed over a saucepan of gently simmering water, making sure that the bottom of the bowl does not touch the water. Stir occasionally until the chocolate and butter have melted and are smooth.


Carefully remove the bowl from the heat. Let cool slightly; stir in coffee and vanilla extract. 


Add the almond meal and sugar. Mix well until combined. 


Lightly beat the egg yolks in a separate bowl; stir into the chocolate mixture.


Beat the egg whites in a clean bowl until they form stiff peaks. 

Make sure the stool is large enough to accommodate 2 granddaughters.

Gently fold a large spoonful of the egg whites into the chocolate mixture, then fold in the remainder until completely incorporated.


Spoon the batter into the prepared pan and bake for 35-40 minutes, or until risen and firm on the top but still slightly gooey in the center. Let cool in the pan, then invert onto a cookie sheet or platter, and remove the parchment paper. Dust with confectioner's sugar and baking cocoa if desired.

Enjoy!