Showing posts with label Side dishes. Show all posts

Thursday, May 9, 2013

Guacamole, Mexican Style

While in Mexico, I had a few things I wanted to do. One was to see the Mayan ruins. Check. Another was to watch my Mister snorkel. Check. Yet another was to learn to tread water (because I sink like a stone) in the salty Caribbean Sea. Check.  I also wanted to take Salsa dancing lessons. But after some careful consideration, and a reality check from my Mister, I gave up that dream. You see, I can't dance. Not because I'm white, but because the sounds in my head are far louder than the beats coming from the boombox.

Kind of like Elaine from the television show, Seinfeld.


Now, that girl can move.

Okay, maybe I'm not that bad, but learning to Salsa was not going to happen on this trip. So I appealed to my Mister's primal instincts. Food. Specifically guacamole.

The resort that we stayed at offered a guacamole class (incidentally, right after the Salsa dancing class!),  taught by their head chef. Never mind that we were swimming in the pool when the class was announced. And really never mind the pictures of me with swimmer's hair and orange skin, while wearing a wet t-shirt.

I beg you.


In order to recreate this at home, I opted to leave the swimsuit and the sunburn out.

You're welcome. ☺


~Guacamole~

1 ripe avocado
1-2 Tb. finely chopped tomato
1 Tb. minced onion (or less, depending on your preference)
1/2-1 Tb. minced jalapeno, seeds and membrane removed (again, use what you prefer)
1/2 Tb. fresh cilantro, chopped fine
1/2-1 Tb. fresh lime juice
pinch of sea salt
 
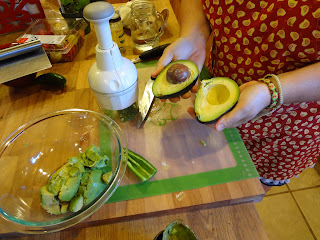
First, remove the large pit in the center of the avocado. In order to do this, take a knife and slice around the entire avocado, top to bottom.
 

Gently twist to separate the 2 pieces.
 
 
Take your knife and very carefully, hit the blade into the pit. Just as carefully, twist the knife to remove the pit.


Pretty cool, huh? The Mexican people have it going on.
 
Using a spoon, scoop out the avocado from the skin and place in a bowl. Mash the avocado with a fork until it's smooth and creamy.
 
Don't be alarmed...that jar of yellow liquid is my first attempt at making ghee. Honest.
 
Add the remaining ingredients and stir well.


Serve with your favorite non-GMO tortilla chips.
 
Fresh guacamole does NOT keep well, so it's best to make this right before you need it.
 
Enjoy!


Thursday, August 30, 2012

Time-Saving Potato Brunch Bake

Please excuse the flourescent photo~someone forgot to turn off the flash.

Sometimes life can be complicated. Cows don't calve when they're supposed to (still waiting), children refuse to clean their rooms when asked (and instead draw you a very nice picture~as a  gift), appointments get scheduled at the most inopportune times (who PURPOSEFULLY makes a well-child checkup at 8:30a.m. when it takes 30 minutes to get to town?), etc...Sometimes, a gal just needs a break.

Cooking everything from scratch takes dedication. It takes effort. And it takes time. And sometimes, there just isn't enough time to go around. Those are the moments where something has to give.

Because Mom is just about to break.

This recipe cheats a little on the whole food concept. You could use cooked, diced or shredded potatoes from your own garden (which would be fabulous), but since we're talking about saving time, I used tater tots. Why tater tots?

Because they are gluten-free.

And sometimes, that's good enough for me.☺

~The Players~
 
2 t. olive oil
2 c. Colby cheese, shredded
2 c. Monterey Jack cheese, shredded (mix the 2 cheeses together)
1-1/2 pkg. (32 oz.) Ore-Ida Tater Tots (these are GF, I don't know about other brands)
8 oz. cream cheese, softened
12 eggs, whisked
1/2 t. black pepper
8 oz. thinly sliced deli ham, chopped (or 1 lb. bulk sausage, cooked and drained)
1 small sweet onion, chopped
1 sweet red pepper, diced
1 c. diced tomatoes
2 Tb. chopped chives
 
Preheat oven to 450F. Lightly brush an 9" x 13" casserole pan with 1 t. olive oil. (I used a Pampered Chef medium bar pan.) Lay tater tots in a single layer in pan.
 

Take pictures of your goofy adult daughters "helping" in the kitchen.

 
Sprinkle 2 cups of cheese over tots and bake for 13-15 minutes, or until they start to brown.
 
Using a mixer, beat cream cheese and eggs together. (They may be a little lumpy.) Add black pepper.
 
 
In a small pan, saute onions and ham in remaining olive oil until onions are soft. Stir into egg mixture.
 
Pour egg/ham mix over tater tots.


Return to oven and bake 8 minutes, or until eggs are set in the middle. Remove from oven and add remaining cheese, tomatoes, and chives. Sprinkle with more ground pepper, if desired.
 
 
Enjoy!


Thursday, November 17, 2011

Fancy Schmancy Mac & Cheese


Please do not adjust your screen. This is indeed another recipe.

Because it's raining. Again.

And because it's raining by the bucketfuls, I am in need of some good old-fashioned comfort food, followed by a good old pair of comfortable sweatpants.

Because yes, I over-ate. Again.

While my older kids were growing up, one of their favorite side dishes was macaroni and cheese that I made with Velveeta "cheese". I now know that Velveeta is a pseudo-cheese, being mostly made up of hydrogenated oils and some other stuff, but we loved it. It was like lying on a heater vent under a heavy quilt while watching "The Goonies" kind of comfort.

Don't ask.

I've since tried many different recipes for mac & cheese, but nothing has compared to the Velveeta dish of our past. Until now. Made up by yours truly while dancing around the kitchen to "I Love Rock & Roll", this one was declared a hit with the entire family...

...Just before they ran off to change into something a little more comfortable.

I guess this would be considered sweatpant worthy. I kind of like that rating system. ☺

~Fancy Schmancy Macaroni & Cheese~
(Gluten-free!)

~The Players~
1 lb. brown rice elbow macaroni
8 slices good bacon, chopped
1 large, sweet onion, sliced thin
4 Tb. unsalted butter
1 t. dry mustard
1/2 t. smoked paprika
1/4 t. garlic powder
1/4 C. brown rice flour (or white)
2 C. whole milk
1 C. light cream
2 C. shredded cheddar cheese
1 C. shredded Monterey Jack cheese
1 C. shredded Parmesan cheese
sea salt & pepper, to taste

Cut and cook bacon in a medium-sized cast iron pan. Go ahead and throw in an extra piece to make up for all the pieces that I know you'll be sneaking.

No? Never mind. Must have had you confused with me.☺

Cook the bacon until it's done, but not crispy. Remove bacon from the pan and let drain on paper towels.

Quarter the onion, then slice each quarter into thin pieces. Using the leftover bacon grease, saute the onions on medium heat for 3 minutes.


Add the spices and saute another 2 minutes.


Remove from heat and set aside.

Boil noodles according to package instructions. When done, drain in a colander. Return pot back to stove and melt butter. Stir in the flour, whisking constantly. Cook for 2 minutes while whisking. Slowly add the milk and cream while continuing to whisk.


Add the cheeses and stir. (You'll want to lose the whisk and switch to a spoon~less messy.) Once the cheese has melted, add the cooked pasta, stirring well. Add the onion/spice mixture and bacon; stir. Salt & pepper to taste.

Serves 8.

Enjoy!

*This is gluten-free, but if gluten isn't an issue for you, regular macaroni and flour can be used.


Thursday, November 3, 2011

Spicy Cowboy Fries


Forget for a moment that you're now looking at a partially eaten plate of food. My dinner to be exact. I got so excited about the sweet potato Cowboy Fries and the fact that after dishing up 10 other people, there was still enough left for me that I forgot to take a pre-noshing picture.

I'm a simple gal who likes fries. And salad. And deer steak. With a side of organic ketchup.

Getting simpler by the moment too.

I don't know why we started calling these "Cowboy Fries"; we're not cowboys, don't own a horse, and only eat on the trail if we're lost and stumble upon a huckleberry bush. I "swagbucked" Cowboy Fries and came up with several recipes that look nothing like mine. That said, it would be weird to change the name now, so unless I'm threatened with a copyright lawsuit, the name stays.

Besides, I'm much too lazy to come up with another name now.☺

~Spicy Cowboy Fries~


~The Players~

4 Tb. grated Parmesan cheese (in the can)
1 t. ground cumin
1 t. sea salt
1 t. paprika
1 t. chili powder
1 t. chipotle chili powder
1/2 t. onion powder
1/2 t. garlic powder

Mix ingredients together.


Use or store in a sealed bag in the refrigerator.

This is enough to season 2 cookie sheets full of fries.

To make fries: Cut potatoes (regular or sweet) into wedges or fry strips and place in large bowl. Drizzle with olive oil making sure all the potatoes are covered.


Sprinkle with seasonings; stir to coat.


Place on cookie sheets and bake in a preheated 450F. oven for 30-40 minutes, depending on size. If you like them on the crispy side, it may take a little longer.

 *I've used this on roasted veggies, as a barbecue rub (without the Parmesan), and to season green tomatoes before frying. If you want to cool down the spice a little, decrease or leave out the chipotle powder.

Enjoy!

Monday, August 22, 2011

Cultured Salsa

When I think of salsa, I think of this...


Not to be confused with this...

(photo credit)
Which is just down-right dangerous in my book. Unless you think this is me in the picture, in which case, it was easy. Because I'm a pro.

Did you buy it?

I tried.

If you haven't made homemade salsa, you're missing out on a something special. Lacto-fermented salsa is not heated or water-bathed canned, so it tastes fresh up to 6 months after it's made. I make several batches every year and hide store them in the back of our spare fridge. Of course, the salsa never sees the arrival of Autumn, so it lasting a full 6 months is just an assumption on my part.

That, and I read it on other blogs, so it must be true.

Apparently, they don't like salsa as much as we do.

The key to lacto-fermenting salsa is the sea salt and whey. I have seen other recipes that do not use the whey, but use up to 4 Tb. of sea salt instead. I tried that my first year and it was way too salty for our tastes. Remember to taste test and adjust accordingly.


~Lacto-Fermented Salsa~

4 lbs. organic tomatoes (I used a variety of heirloom tomatoes.)
2 medium sweet onions, like Walla Walla or Vidalia
1 large, organic sweet red pepper, seeded and rough-chopped
**2 jalapeno peppers, seeded and rough chopped**
1 bunch cilantro, leaves only
Optional: 2-4 cloves garlic, minced
juice from 2 lemons or limes
1-2 Tb. sea salt
4 Tb. whey (from drained yogurt)

Peel tomatoes by placing in boiling water for 30-60 seconds, then immediately dumping into icy water. The skin will come off easily.

I guess mine would too.

Core the tomatoes, then place in food processor. Pulse until tomatoes are chopped up, but not liquefied. (Unless that is your preference.) Pour tomatoes into large bowl.

Place onions, red pepper, jalapeno pepper, and cilantro leaves in food processor and pulse until chopped fine. (If using garlic, add this too.) Add this mixture to the tomatoes.

Add lemon or lime juice, whey, and sea salt. Stir will. Taste to check flavor and heat; adjust as necessary.

Pour salsa into wide-mouthed jars (I ended up with 1/2 gallon + 1 quart). Wipe top of jar and place screw-top lid on. Leave on counter for 2 days; then place in the refrigerator.

Then send the kids to Gramma's house and enjoy!

Oh wait, the kids saw me making this...darn.☺

**Remember to use gloves when cutting hot peppers! The "heat" doesn't wash off with soap and water, and can bring new meaning to the song, "Come On Baby Light My Fire"...

...just sayin'.☺

This post is linked to Simple Lives Thursday.

Tuesday, August 16, 2011

Roasted No Mayo Potato Salad


Some things were just meant to be.

Macaroni & cheese, peanut butter & jelly, Sonny & Cher...

Wait, scratch that last one.

Not all things are meant to be, but a picnic without potato salad, well, that's just wrong on many levels.

Growing up, there were several events that I could count on every summer; camping at the coast without a toilet or hot water for 2 weeks, getting up at 4 a.m. to go strawberry picking so I could buy that pair of $40 bell-bottom jeans, a family reunion with boy cousins that were so cute one could only hide behind a tree, crying, "WHYYYYYYY!!!", and food poisoning caused by Aunt So & So's potato salad that had sat on the table for 8 hours.

I learned a lot of lessons during my summer breaks. I learned to squat at just the right angle, and how to take a cold hose "shower" in the middle of the Salal berry bushes without being seen. I learned that Levi's were a better choice of jeans because unlike $40 bell-bottoms, Levi's never go out of style, and at $1.50/flat, that was a lot of strawberries to pick. I learned that my boy cousins, while cute, had a very limited vocabulary of "home-run", "dug-out", and "first-string", and when they ran out of words, they just stood there with their hands in their pockets, seeing how far each one could spit. (I said cute, not smart.) I also learned to stay away from the potato salad at reunions.

Until now.

Some of us have missions in life to fulfill. Mine was to find a potato salad that would not only taste good, but could sit out on the picnic table for hours and not cause violent retching hours later. If you've never had food poisoning, you won't understand, but I'll try to help you grasp this knowledge. Carol Burnett once described childbirth pain as, "take your bottom lip, pull it over the top of your head..."   

I would rather give birth, standing up on the side of the interstate, to an 18 lb. child, who comes out sideways, with my lip pulled over the top of my head, than go through the torture of food poisoning.

Just sayin'.

Now that you're good and scared of traditional mayonnaise-based potato salad's, give this tangy mayo-free version a try. You may never go back to mayo again.☺

~Roasted Potato Salad~

~The Players~

6 Tb. olive oil
6 cloves of garlic, minced
1 t. sea salt
fresh ground pepper, to taste
4-5 sprigs of fresh thyme leaves, chopped
2-3 sprigs of fresh rosemary leaves, chopped
3 lbs. thin-skinned potatoes, diced to bite-size (use organic!)
2 Tb. citrus-based vinegar (I used a champagne vinegar)
2 t. Dijon mustard
3-4 Tb. olive oil
6 green onions, chopped
1 cup fresh, chopped basil leaves

Preheat oven to 375F.

Mix 6 Tb. olive oil, garlic, salt/pepper, thyme, rosemary, and potatoes together on a large baking pan (with sides). Bake for 45-50 minutes, stirring occasionally, until potatoes are nicely browned and soft.

Remove from oven and allow to cool on counter until room temperature. When cooled, place potatoes in large bowl.

In a small bowl, whisk vinegar, mustard, and 3-4 Tb. olive oil together. Pour vinegar/oil mixture over potatoes and toss to coat.

Add green onions and basil, mixing well.

Check salt and pepper and adjust as needed.

Allow to sit on counter for at least 1 hour to allow flavors to mesh.

And the best part? Serve at room temperature!

Enjoy!


Wednesday, August 10, 2011

Mango & Black Bean Confetti Salad

Recently, I attended my first Pampered Chef party. One of the tasty treats we sampled was Mango Confetti Salsa.

I may have doubled dipped.

Okay, I'm sure I did.

And I have no guilt. Or shame. Because it was amazing.

After I purchased the mango slicer, I booked my first party.

Because of that salsa.

Before the mango slicer came into my life, I was one of those crazy people who would gnaw and gnash, like a rabid dog with a meaty bone, trying desperately to get the mango flesh off of the pit. The pittance of mango that I actually ate was nothing in comparison to the amount of juice, and probably slobber, that dripped from my chin. But still I would try. Until one day when someone actually caught me gnawing and gnashing.

Remember, I have no guilt and certainly no shame, but for the sake of the children, we relocated.

And until now, none of my new neighbors knew about my shady mango past.

Now that I have the mango slicer, mangoes are back on the menu, and because one can't live on salsa alone (or so I've been informed), I came up with my own version in a salad form. Complete with protein.

Gnawing and gnashing are optional.☺

~The Players~

2 mangoes, diced
1 large, sweet red pepper, diced
1/2 cup chopped green onions
1 can black beans, drained and rinsed
1 fresh jalapeno pepper, seeded and minced (use gloves!)
1 cup sweet corn (if using frozen, thaw by running under water in a colander)
1 cup tomato, diced (I used grape)
zest and juice of 3 limes
2 Tb. olive oil
1/4-1/2 cup fresh cilantro leaves, chopped
sea salt & pepper, to taste

Combine ingredients in a bowl. Can serve immediately, but flavors intensify if refrigerated for 1 hour first.

I've made this several times now and each time is different. Try adding grilled chicken, or taco meat with olives for a different version of taco salad. Or use it as a topping for some fresh caught, grilled salmon.

Guess it's going back on the menu again!☺

Enjoy!

Sunday, August 7, 2011

Crispy Zucchini Fries


Well, now I know. God has a sense of humor. I'm almost sure it is His laughter I hear every time I walk out to the garden and find yet another zucchini.

Some might think it's summer thunderstorms, but I know better.

He's laughing.

This year, the only produce that is growing well in our area seems to be the zucchini, otherwise known as the bane of my existence, or the thorn in my side. I'm not sure why the green beans can't be as prolific as the squash, especially since I really enjoy a fresh, stir-fried, garlicky green bean. I'm unclear as to why the tomatoes, which bring me so much joy as bruschetta, fresh salsa, or nestled in-between the bacon and lettuce of a really good BLT, can't seem to get past the green marble stage before falling off the plant.

What I do know is that I can let The Year of the Zucchini continue to frustrate me, or I can learn to love it.

At the very least, I can disguise it into something I really like.

Like french fries.

Somehow, I think He expected that.☺

I didn't use exact measurements for this recipe, but it really is simple to prepare. You'll want to eat these fries while they're hot, so bake them just before dinner is ready.

~Crispy Zucchini Fries~

~The Players~
zucchini, cut into 4" french fry strips
whole wheat flour (enough to coat fries)
2 eggs
*Panko (at least 2 cups) 
fresh grated Parmesan cheese (about 1/2 cup)
cayenne pepper (about 1/2 t.)
salt & pepper

Preheat oven to 425F.

Cover cookie/baking sheets with parchment paper. This will keep the fries from sticking and will help to brown them evenly.

Put the eggs, and Panko into 2 seperate pie plates or bowls. Add water to the eggs and beat well.

To the Panko, add Parmesan cheese and cayenne pepper; mix well.

 Use a plastic bag and pour the flour into it. Add a handful of zucchini "sticks" to the bag; shake to coat with flour.

Dip the zucchini, one at a time, into the egg wash, then the Panko mixture, coating well.

Lay the "fries" on the parchment paper in a single layer. Sprinkle with salt & pepper to taste.

Bake for 20 minutes, or until golden brown and "crispy".

Eat plain, or serve with warmed marinara sauce.


And make extra~these go fast!

Of course, that may have been my fault.☺

Enjoy!

*Japanese bread crumbs, otherwise known as Panko, can be found in most grocery stores, health food stores, and fish markets.

This post is linked to The Homestead Barn Hop!


Wednesday, July 20, 2011

Fritters, Zucchini Style


The zucchini nightmare has begun.

Somewhere between the first zucchini of the season and the pulling of the spent plant in the fall, I have to try and come up with new and exciting ways to use this prolific summer squash.

I don't know if I've mentioned this before, but I really don't like zucchini.

At all.

I was the child who would still be sitting at the dinner table, hours after dinner was actually over, lamenting over the fact that my parents couldn't possibly love me if they were forcing me to eat a food that caused violent retching and possible convulsions.

I'm fairly certain that zucchini played a role in my pre-pubescent acne epidemic, and was probably the cause of Mt. St. Helens erupting in 1980 too.

My parents also called me "dramatic", but I think I was just misunderstood. (Clearly.) See, it's not as if I didn't like green foods. I loved sour apple Jolly Ranchers. Green jello made me smile and a tall glass of lime Kool-aid made me downright swoon. In fact, I'm fairly certain that I consumed every color of the rainbow in the Kool-aid department, but put a plate of zucchini in front of me, and green became my nemesis. 

As an adult, I love to grow zucchini in the garden, but that's where it ends. Unless that veggie is hidden in layers of chocolate, and flour, I still have issues with it. Unfortunately for me, my family LOVES zucchini. And not just the green stuff either. They like every kind of squash out there and expect me to prepare it for them!

Will this nightmare ever end?

Yes!

I have discovered Zucchini Fritters and life will never be the same.

Just please don't tell my children...I'm not done martyring myself yet.☺

~Zucchini Fritters~
~The Players~

4 cups grated zucchini
4 eggs, beaten
1/2 cup chopped onion
2-3 cloves garlic, minced
1 Tb. dried parsley ~or~ 2-3 Tb. fresh parsley, chopped
1 cup flour (I used brown rice flour to make it gluten-free.)
1 cup grated Parmesan cheese (not the stuff in the can!)
salt & pepper, to taste
expeller-pressed coconut oil for frying

Mix all ingredients except for the coconut oil in a large mixing bowl. In a heavy skillet, heat a few Tb. of coconut oil to medium hot. Drop batter into skillet to make 3-4 inch pancakes. Cook for about 2 minutes on one side, or until edges turn brown.
Carefully turn the fritters over and cook another 2 minutes. Remove and lay on paper towel to absorb excess oil. Cover to keep warm. Continue to cook remaining batter, adding more coconut oil as needed.
Serve with sour cream.

Enjoy!

I'm linking up with The Homestead Barn Hop~C'mon over!

Thursday, June 30, 2011

Sweet & Spicy Pickles


Once upon a time, there was a dill pickle. The dill pickle was always comfortable being a dill, but had aspirations to be more than just a condiment on top of grilled burger.

It had dreams of topping egg salad.

And in a perfect world, just being eaten straight out of the jar.

A couple of years ago, my in-laws decided to pull us out of our dill pickle comfort zone. Initially, I declined to try one of their newly discovered pickles, but after hearing the "ooohs and ahhhs" of my Mister, I relented.

Since then, not a day has gone by that we've been without having these dill pickle converts in our fridge.

This is by far the easiest "canning" recipe I have ever used. It requires no canning and uses dill pickles that can be picked up at Walmart for just a couple of dollars. Within 3 days, what once was dill is now sweet & spicy.

It's magic.

~Sweet & Spicy Pickles~

I had these on hand, but prefer the Vlasic from Walmart.

~The Players~
1/2 gallon kosher dill pickles
1 cup apple cider vinegar
1/2-1 cup sliced, canned jalapenos
4 cups organic sugar
1/2 gallon jar with a tight-fitting lid

Drain the dill pickles in a colander for about 2 hours.


Cut pickles into 1/4" slices.  Put into a half-gallon jar.


Shake the jar to help settle the pickle chips. In order, add jalapenos, sugar, then the vinegar. You may need to add the sugar slowly and allow it time to fall down into the jar. I used a butter knife to create little "canals" for the sugar to drop into. Do not add the vinegar until all of the sugar is in the jar though.


After the vinegar is added, cover top of jar with plastic wrap before screwing the lid down tight.


Turn the jar upside down and set in a pie plate. (Just in case the jar leaks!)


Flip the jar 2-3 times a day for 3 days. The sugar will dissolve and you will be left with a sweet pickle that has a little "kick" to it.

Now if you'll excuse me, I've got some egg salad to make!

Enjoy!


Tuesday, May 17, 2011

Spring Risotto

Last week, before my boycott of the grocery store, I found some organic asparagus that looked entirely too good to pass up. The produce man was unpacking and stacking it as I stood next to him, commenting that it had just come off the truck.

That's really all it took to convince me to buy some. "It just came off the truck." I was so excited that everything after that is just a blur. Including the price. 

I wish I could tell you how much I paid for it, but it seems I've blocked it from my memory. That's a good thing...no sense ruining this perfect lovely recipe over something so trivial as cost.☺ 

My Mister and I planted some asparagus in our garden last year, ready to wait the prerequisite 2 years before our first tiny harvest. I wish the asparagus had been as ambitious as us. Not one single stalk popped up out of the ground this year. 

Not one.

I'm not too upset though. I have 10 dahlia bulbs ready to replace the non-compliant asparagus.

Dahlia's make me almost as happy as asparagus.☺

~Spring Risotto~

Risotto goes well with grilled salmon.

~The Players~

2 Tb. unsalted butter
2 Tb. extra virgin olive oil
1/4 onion, chopped
1 cup Arborio rice
3 cups chicken stock (can use vegetable or beef stock)
2 cups asparagus, cut into 1-inch pieces
1 cup white mushrooms, sliced
1/2 cup Parmesan cheese, grated
salt & pepper, to taste

In a large skillet, heat butter and olive oil. (Medium-high heat) Add onion and saute for 3 minutes. Add rice and cook another 2 minutes. Add 1 cup of broth, stirring constantly. When the broth has been absorbed, add another cup of broth and wait until absorbed again. 

Meanwhile, blanch the asparagus for 2 minutes. Put asparagus in ice water and set aside until needed. 

Add the final cup of broth, stir, then add asparagus and mushrooms. Turn heat down to medium-low and place a lid on the pan. When the broth is again absorbed, check rice for doneness. If the rice isn't cooked, add a little more broth or water and continue to cook until done. 

Remove from heat. Stir in Parmesan cheese, salt and pepper.

Enjoy!

Tuesday, April 12, 2011

Perfect Potato Patties


Hi. My name is Kim.

And I'm a kitchen gadget junkie.

IKEA is a favorite place for me to feed this addiction. So is Bed, Bath & Beyond, Target and even Walmart. It's an illness really. A disability if you will. This addiction of mine renders me completely helpless until it is fed. I quiver in anticipation when my 20% off coupon arrives in the mail and I look for any excuse to go to town, just so I can browse the can openers, oyster shuckers, toast tongs, and wooden spoons. I have strawberry hullers, paring knives, peelers, flippers and scrapers galore. And most of these I actually use on a regular basis.

Then there is the drawer in my kitchen for my impulse buys; the ones I'm completely clueless about. I call it the Land of the Misfit Gadgets.

Up until last week, this one was their leader.


But not anymore. This is a potato ricer and it now has a purpose. In fact, my family has declared this former misfit the new gadget king of the kitchen.

A potato ricer's job is to squeeze the cooked potato through the tiny little holes, leaving the excess moisture behind. The potato ends up looking like long rice, hence the name ricer. Potato gnocchi and mashed potatoes, without the lumps, are common uses for this device, but I've decided that it's a must for potato pancakes. 

Every potato pancake I've ever made has been from leftover mashed potatoes. In order for the pancake to stick together, I've had to add a lot of flour. This ends up tasting less like potato and more like dough, which does not make my family line up for dinner!  

Make sure you use organic potatoes whenever possible. As one of the dirty dozen, conventionally grown potatoes can carry as many as 37 different pesticides! Eww.

These are plenty good without the pesticide seasonings. Trust me.


Perfect Potato Patties

~The Players~
6 large organic russet potatoes
4 green onions, chopped
1 cup organic sweet peppers (another dirty dozen member)
1/2 cup fresh parsley, chopped fine
1 egg
1 cup fresh grated Parmesan cheese
1/4 cup all-purpose flour or rice flour
1 t. paprika
1 t. sea salt
1/2 t. garlic powder
fresh ground pepper to taste
a good oil for frying~I used refined coconut oil (without the coconut scent)
Optional: applesauce or sour cream


Peel the potatoes. Cut into 2-inch sized pieces and place in pot. Add enough water to cover. Bring to boil and cook until potatoes are soft, but not mushy.

Using a potato ricer, squeeze potatoes through into a large bowl or the same pot that the potatoes cooked in.


Add remaining ingredients and mix together with your hands.


In a large cast iron frying pan, heat enough oil to measure 1/8" deep.

Form patties in your hand and gently place in hot oil, cooking for 3-5 minutes on each side. If the oil starts to get too hot, remove from the burner to allow it to cool off a little. Continue until all are fried. Keep warm under a towel until done.

Serve with applesauce over the top or a dollop of sour cream.


*My oil got a little too hot while I was trying to take pictures. Maybe there's a gadget for that?

Enjoy!