Thursday, May 9, 2013

Guacamole, Mexican Style

While in Mexico, I had a few things I wanted to do. One was to see the Mayan ruins. Check. Another was to watch my Mister snorkel. Check. Yet another was to learn to tread water (because I sink like a stone) in the salty Caribbean Sea. Check.  I also wanted to take Salsa dancing lessons. But after some careful consideration, and a reality check from my Mister, I gave up that dream. You see, I can't dance. Not because I'm white, but because the sounds in my head are far louder than the beats coming from the boombox.

Kind of like Elaine from the television show, Seinfeld.


Now, that girl can move.

Okay, maybe I'm not that bad, but learning to Salsa was not going to happen on this trip. So I appealed to my Mister's primal instincts. Food. Specifically guacamole.

The resort that we stayed at offered a guacamole class (incidentally, right after the Salsa dancing class!),  taught by their head chef. Never mind that we were swimming in the pool when the class was announced. And really never mind the pictures of me with swimmer's hair and orange skin, while wearing a wet t-shirt.

I beg you.


In order to recreate this at home, I opted to leave the swimsuit and the sunburn out.

You're welcome. ☺


~Guacamole~

1 ripe avocado
1-2 Tb. finely chopped tomato
1 Tb. minced onion (or less, depending on your preference)
1/2-1 Tb. minced jalapeno, seeds and membrane removed (again, use what you prefer)
1/2 Tb. fresh cilantro, chopped fine
1/2-1 Tb. fresh lime juice
pinch of sea salt
 
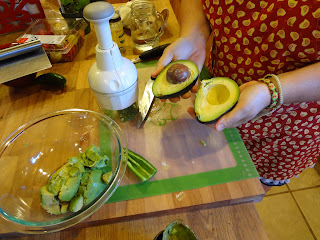
First, remove the large pit in the center of the avocado. In order to do this, take a knife and slice around the entire avocado, top to bottom.
 

Gently twist to separate the 2 pieces.
 
 
Take your knife and very carefully, hit the blade into the pit. Just as carefully, twist the knife to remove the pit.


Pretty cool, huh? The Mexican people have it going on.
 
Using a spoon, scoop out the avocado from the skin and place in a bowl. Mash the avocado with a fork until it's smooth and creamy.
 
Don't be alarmed...that jar of yellow liquid is my first attempt at making ghee. Honest.
 
Add the remaining ingredients and stir well.


Serve with your favorite non-GMO tortilla chips.
 
Fresh guacamole does NOT keep well, so it's best to make this right before you need it.
 
Enjoy!


Sunday, May 5, 2013

Where I've Been, and What We'll Be Eating

Hola`! After a month-long blog "sabbatical," I'm officially back. Not that I had a choice of coming back, after all, my family knew where I was and would've used whatever means necessary to haul my tail back home.

So, where was I? Well, part of the time, I was busy packing for a trip abroad. The other part? I was mentally preparing for a child-less trip to Cancun, Mexico. After taking numerous road trips over the years with 9 or 10 children in tow, it takes a completely different mind-set to ready oneself for an adults-only resort vacation. Oh, but what a quick learner I was!

A view of the Caribbean Sea from our 10th floor hotel window

Being a creature of habit, I'm not one to venture too far from home. I have a healthy fear of flying, don't like large crowds, and am a somewhat (☺) of a control freak. My only expectations were to take a nap on the beach and have someone else cook meals for me that didn't make me sick. I thought with my expectations low, I couldn't be disappointed. But I ended up conquering fears and living out dreams I never even knew I had

On the island of Isla Mujeres

I embraced my inner Audrey Hepburn and glammed it up on a white sandy beach.

Shortly before we headed in to a 3-1/2 hour couples massage/pampering. Glory be. That was my idea of a vacation.

The Mister and I rediscovered what it was like to be responsibility-free, if only for a few days.


I embraced the sunshine...

Within 2 minutes, my little chameleon friend turned as orange as I was.

...even though it didn't embrace me back.

I became one with nature.

In the jungle, where it was habanero HOT!

Iguana's everywhere! I called this one, Gus.

And the Mister & I held a shark. Okay, it was toothless and a vegetarian, but it was a shark and we're darn lucky to be alive. *wink*

Little did we know, there was a second shark in the pen with us.

I was able to share in the joy of seeing my Mister fulfill his life-long dream of captaining a catamaran in the Caribbean, and I even witnessed Jesus taking the wheel.

Captain Jesus and my Mister sailing the catamaran and all 45 passengers back to the Port of Tortuga (It really exists!)

And finally, I was able to see a piece of history that I have dreamed about since I was 10 years old. The Mayan ruins...even though most of it was seen through sweat and tears of joy. (Have I mentioned that it was hot?)
Brother, sis-in-law, me, and the Mister at the Pyramid of Kukulcan ~ Chichen Itza Ruins


Las Monjas or the Building of the Nuns

The Temple of the Jaguars


The Astronomical Observatory, which was still hidden among the jungle vines less than 20 years ago.

Now that we've gotten the hang of how to relax and be tourists, we'll be doing this again next year...with a little extra sunblock and a whole lot of expectations. ☺

Because I couldn't bring the fabulous chef's from Cancun home with me, it's time to get back to real-life meal planning. Here's what's cookin' this week...

~Sunday~
cereal
Cinco de Mayo Casserole, guacamole (recipe coming this week!), tortilla chips
 
~Monday~
Raw Greek Yogurt (recipe coming), fruit of choice, toasted almonds
leftover Cinco de Mayo casserole, green salad with Kefir Ranch Dressing
 
~Tuesday~
Speltcakes with peach puree "syrup"
Butternut Squash Enchiladas (new)
 
~Wednesday~
Baked Peanut Butter Oatmeal, banana
Meatloaf, roasted Rosemary Red Potatoes, green salad with balsamic vinegar/olive oil dressing
 
~Thursday~
Cinnamon Spice Granola with raw milk
Parmesan-crusted tilapia (new), Risotto, steamed broccoli
 
~Friday~
Design-an-Omelet
Barbequed chicken, Roasted No-Mayo Potato Salad, fresh fruit
 
~Saturday~
Homemade Barbeque Chicken Pizza (gluten-free)


Tuesday, March 12, 2013

Homemade Whey Ricotta


I'm a fairly simple gal. I don't wear makeup at home, only shave my legs when we're expecting more than 3 days of sunshine, and consider lavender goat's milk soap to be the equivalent of a large bottle of Dior perfume.

Honestly, anything with the word "fume" in it is lost on me.

I also enjoy finding multiple ways to use something up before tossing it into the recyclable bin, Goodwill box, compost pile, or pig trough.

With all of the cheesemaking I've been doing lately, I'm finding that the whey tends to add up. Especially if I make a 2 lb. batch of cheese on a daily basis.

Ya. We like cheese.

After doing a quick Google search on ricotta, I found a recipe using just the whey. Whey is the liquid that is left after all the milk solids are used to form the curds. At least, I thought they were all used up.


Looking into the pot, I couldn't see how anything else could be extracted from the liquid. Sure, there were little white particles floating on top, but they were few and far between, and according to the recipe, for every 2 gallons of whey used, I should expect 2-3 cups of ricotta.

Well, if you know me at all, I like a good challenge. Even if my ricotta adventure ended up being an epic fail, I would have the satisfaction of knowing that I doubted this little endeavor to begin with. And for a simple gal like me, that can be good enough.

Occasionally though, I like to be proven wrong. ☺

Here's what you'll need:

2 gallons leftover whey from making mozzarella
a large pot that has several inches of space at the top once the whey is added
long-handled slotted spoon (I use a skimmer.)
2 thin 100% (non-terry) cotton towels, or several layers of cheesecloth
colander
thermometer


Set a colander in a large pot and line the colander with 1 towel. Strain your fresh whey through the towel to remove any bits and pieces that may be in the liquid. Remove colander/towel and place a lid on the pot. Set the pot on the back of the stove and leave it for 12-24 hours to culture.

The next day, remove the lid and place the pot on medium heat. Bring the temperature up to 208 degrees, stirring occasionally to keep the solids from sticking to the bottom of the pot. (Trust me, those solids are in there, even if you can't see them!)


Be careful when taking the temperature, the steam is very hot! See how the yellow-ish liquid has turned white and foamy? This is what you want.

Give the whey another good stir, remove from heat and replace the lid. And wait. For me, this is the toughest part.

I'm simple, not patient.


When the liquid is cool enough to handle, line your colander with towel #2 and set inside another large pot. Gently scoop out the solids. I scoop as much as possible, then gently pour the rest through the towel/colander.

Once most of the liquid has drained from the solids, gather the corners of your towel and tie with a rubberband. Hang the cheese to drain until the bag no longer drips, approximately 1 hour. Don't worry if your ricotta drains longer; if it's too dry, you can add a little milk or cream until it reaches a consistency that you like.

I use a muslin bag for hanging the ricotta.

Don't worry about getting fancy with the hanging, just make sure that there's a pot beneath to catch the drips. Trust me.

My fancy method of hanging cheese works great, unless I need cinnamon out of the spice cabinet.☺
One the cheese is drained, scrape it out of the towel and place in a covered glass bowl. Refrigerate for up to 1 week.

Use your ricotta in pasta dishes, as a base for dips or salad dressings, or on pancakes with a little homemade jam. Yum!

And if you have have chickens or pigs, they'll appreciate the leftover-leftover whey.

Our newest pigs~The Haminator, Porkticus, and Swineheart

Probably more than the homecoming "gifts" of free bagels and doughnuts.

I think the "boys" and I are going to get along just fine, don't you?

Thursday, February 28, 2013

You Should Know #7...The "Romance" of Milking

 
It's been almost 6 months since our Jersey cow Tilly, gave birth to Maggie Moo. It's been exactly 5-1/2 months since we started milking Tilly. And it's been about the same amount of time that I've been pondering what to do with all that milk.
 
Will work for molasses-covered oats.  Moo.
 
 I'll have you know, I am still clueless.
 
See, there are only so many things one can do with fresh cow's milk. Oh, there are blogs out there that will tell us that you can make, bake, cook, can, knead, dehydrate, rehydrate, soak, scrub, and bathe in it, but I've found that they are only telling you that so you'll try it first. And then maybe, just maybe, you'll let them know whether it works or not.
 
Here's what you should know about the romantic side of milking...
 
1. A cow has mood swings, much like a human woman. Any attempt to touch any part of her anatomy during this time could result in a swift kick to the kneecap. Or the face if you're dumb enough to have it under the cow. Or, so I've heard... She can also hold on to her milk if the mood so strikes her. It's best to come prepared. A triple-shot grande Caramel Macchiatto scoop of sweet grain ought to do. 
 
2. If you only bring 2 empty gallon jars up to the barn, chances are, the cow will give you exactly 3.33 gallons of milk that day. Which results in someone carrying down a 40 lb. milking machine from the barn, in the rain, on an empty stomach, with only 1 cup of coffee under her belt yoga pants. And because of her weakened condition, she'll probably forget the filter up at the barn after she's made the trek back down to the house.
 
3. 3 gallons of milk/day x 7 days/week  = a million or so gallons of milk in the fridge. I mean fridges. As in 4 of them. Ratchet straps and bungee cords are a farmer's friend. Because there's always a way to squeeze just one more gallon into an already full refrigerator.
 
4. One can never have too much Mozzarella. Until the last little spot in the freezer is full anyway. Then one comes up with tricky little ways to incorporate the excess cheese into a meal. Or dessert. Mozzarella Ice Cream anyone?
 
 
5. Ambitious husbands who get sick of Mozzarella, are quite adept at building cheese presses. Nothing says, "hint, hint" like a 50 lb. press. Complete with a bathroom scale. Hey, it works, and I've quit obsessing over my weight. I call that a "win, win."
 
6. Just because you now have a cheese press, doesn't mean that your first, second, or third attempt at making cheese will work. The good news with that is that you can now remove the ratchet strap from one of the refrigerators. The bad news is that you've crushed the entire family's dreams of having anything that's not Mozzarella.
 
7. When you have a catastrophic cheese-making experience, you will always revert back to what you know. Mozzarella. Because your self-esteem needs a little bit of a boost. And the family knows this, so they pretend to be pleased that you've found a way to use Mozzie in a cake.
 
8. Sometimes, the cheese making actually turns into something good. Like Farmer's Cheddar.
 
 
But then you read the fine print under the recipe; Farmer's Cheddar has to age.
 
For 30 days.
 
And for 30 days you worry that it will be rotten, sour, or positively inedible. 
 
So, you make another batch of Mozzarella, because you can.
 
9. In order to age the Farmer's Cheddar, it has to be painted with wax. This appeals to my artistic side. I feel like I can sculpt a masterpiece that rivals Michelangelo.
 
 
Well, maybe Donatello. Or Raphael. Or Leonardo. In a Teenage Mutant Ninja Turtle sort of way.
 
10. 2 gallons of milk = 2 pounds of cheese. It also equals about 20 gallons 1.95 gallons of leftover whey. Now, leftover whey is great for growing piggies into pork chops, but what to do with all that whey once the piggies have moved to the freezer?
 
 
Hmmmm...how 'bout some homemade whey ricotta?
 
Stay tuned....☺


Thursday, January 24, 2013

Still alive...

You remember that moment in the late fall when you realize that life is about to finally slow down? You know~after the canning, garden clean-up, butchering, winterizing, back-to-school planning, etc...

I remember it too.

Only, the slow-down didn't happen here.

Still busy, just a different kind of busy. Here's some of what we've been up to...

Bailey guarding the feed room door.

We said goodbye to our beloved behemoth, Bailey. At 14-1/2 years old, arthritis had set in and  crippled her. She was ready, even if we were not. The hardest decision was whether to let her die of natural causes and bury her, or to call the butcher truck and end her suffering.

We chose the latter. Somehow, it seemed less wasteful. Hopefully by the time our hamburger is ready, we'll be ready.

For now though, we're eating a lot of vegetarian meals.☺

"Hey Porky, you've got a smear of jelly behind your ear!" Pigs.

Porky left for freezer camp too. The largest of our three pigs, he weighed in right at 300 lbs. His siblings were about 50 lbs. behind him, so they're hanging out a little longer.

Porky was a real pig.

We'll give up our vegetarian ways when the bacon is ready.☺

Baker Creek Heirloom Seed Company~LOVE.

My seed order finally arrived. All 66 packets of seeds. I've always said that I'm an addiction just waiting to happen.

Hi. My name's Kim and I'm a seed catalogue-aholic.

Hmm...I thought that would purge my guilt. But alas, I have none. Not whatsoever.

Shameless. Is it Spring yet?

12 feet of laminated ugliness.

I've been spending a lot of time with the new "man" in my life. His name is Mr. Orbital Sander. I love him. He allows me to take ugly furniture like the table above, and turn it into something less ugly.


Sand, primer, sand, paint, sand, paint, sand, seal.

It's hard to tell from the picture, but the table color is ivory painted over barn red, then sanded. I'm not sure it will stay this color, but for now, I'm diggin' it.

I'm currently eye-balling some ugly laminate cabinets...


...in the dining room, utility, family room, and all 4 bathrooms.

My Mister got scared, so he booked us vacation tickets to Cancun.

Like a trip to a tropical paradise will distract me from Mr. Orbital Sander.

Pshhh...Men.☺

Thursday, January 3, 2013

January Meal Plan


Now that it's a new year, I've decided to start planning meals again. Not that I wasn't before, I just lacked the "follow through."

It's all about the follow through.

Even though I had the best of intentions, my lack of motivation kept me from doing the important things like, thawing the meat, soaking the beans, buying the groceries, etc...More often than not, I found myself pulling out the omelet pan and scrambling up some eggs.

Omelette's were even too ambitious because they require thought, and my only thought was "git er done." Hence, the scrambling. Not exactly the meals that dreams are made of.

When planning for a month of meals, I start by shopping in the pantry/freezer first. Then I list the meals that my family likes, that are time-convenient, or are meals that use whatever I have an abundance of. After that list is finished, I divide them into weekly plans and write them on a weekly planner. (This planner is much classier than my old stand-by...the spiral notebook.) On the back of each weekly planner, I write my grocery list. I've found that it's important to take both my meal plan and my grocery list together, because I almost always forget to add something.

I say almost always because it makes me feel more competent than I really am. ☺

Our monthly budget for groceries varies, but we try to keep it around $150.00/week. Every 3 months, we make a Costco and Bob's Redmill run to restock basics such as; sugar, dried beans, rice, spices, and gluten-free staples.

And it ensures that the Mister and I have at least 1 day every 3 months without kids.

It's the little things, really.

Here's what's cookin' this month~

~Week 1~
baked chicken, Mac & Cheese, roasted broccoli/cauliflower
White Chicken Chili (new), gf Cornbread
Parmesan-crusted Tilapia, brown rice/butter, green salad
Homemade gf Pizza
Leftovers
~Week 2~
Lentil Burritos, Guacamole, tortilla chips
Crockpot Mongolian Beef, brown rice, salad
Thai Butternut Curry Soup, Bob's Redmill GF Hearty Whole Grain Bread
Leftovers
~Week 3~
Pot roast, Roasted Rosemary Potatoes, veggie (to be determined)
Venison Stroganoff, jasmine rice
GF Beef Empanadas (new)
Salmon Patties, brown rice w/butter, green beans
~Week 4~
baked potatoes, cube steak, salad
Spicy Thai Noodles (with brown rice noodles)
Mexi-Mac, sweet corn
Salsa Chicken, brown rice, salad
Breakfasts: Soaked Oatmeal, brown rice farina, eggs, raw milk kefir smoothies, muffins, Cinnamon Spiced Granola
Lunches: Leftovers, nachos, egg salad or tuna sandwiches (on home-baked bread)
Since I've only planned 28 of the 31 days of January, that leaves room for date nights out, or date nights in...
Hey, it could happen. ☺


Wednesday, January 2, 2013

Gluten Free "Neiman Markus" Cookies


Okay. So, I'm about to share with you just how far removed from civilization I've been. I have a cookie recipe, apparently from someone named Neiman Marcus, and until today, I had no idea who or what that was.

*Gasp*

Neiman Marcus is a store that carries designer labels. I googled them. They carry clothes that are usually only seen on runway models. Clothes that normal women roll their eyes at and wonder, "Did she not notice her striped shirt and checkered pants do not go with that paisley jacket?" And that those hideous make-your-eyes-cross patterns sell for $1,000 a piece? And we (I'm inserting myself here) normal women notice that these same models look like they've never eaten a cookie a day in their lives? And then, some clueless woman who thinks Google is a Godsend, finds that not only does Neiman Marcus carry make-you-dizzy outfits, but the store also sells cookies!?!

Be still my heart. Finally. A store that caters to the blind and the hungry. Now, that's a place I can get behind.

Just as long as I don't have to wear paisley with my striped wool socks. ☺

Gluten-free "Neiman Marcus" Chocolate Chip Cookies


~The Players~
 
1 cup unsalted butter, room temperature
2 cups brown sugar
6 Tb. granulated sugar
2 eggs
4 t. pure vanilla extract
1 t. baking soda
1 t. baking powder
1 t. sea salt
3-1/2 cups gluten-free cookie flour blend (*see below)
1-1/2 t. xanthan gum
1 Tb. instant espresso powder
2 cups chocolate chips


In a large mixing bowl, cream the butter and sugars together until fluffy.


Add the eggs and vanilla and mix well.
 
 
In a smaller bowl, whisk together the baking soda, baking powder, sea salt, flour, xanthan gum, and the espresso powder. Mix the dry ingredients into the butter mixture until thoroughly combined.
 
 
Stir in the chocolate chips.
 
 
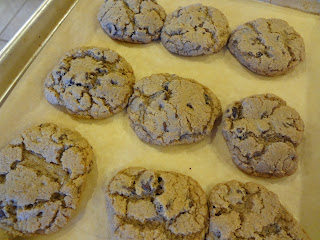
Drop by large spoonfuls (or cookie scoop) onto parchment lined cookie sheets.
 
 
Bake @ 375F. for 10-12 minutes. Remove from oven and allow to cool slightly on the cookie sheet before moving to cooling rack.
 
~GF Cookie Blend Flour~
 
2 cups fine-ground brown rice flour
2 cups fine-ground white rice flour
1-1/3 cups potato starch (not potato flour)
2/3 cup tapioca starch/flour
 
Mix ingredients together. Store in a tightly covered container in the refrigerator until used.
 
The flour recipe comes from Mary Capone, contributing writer/chef for Living Without magazine.
 
Enjoy!