Thursday, March 31, 2011

Farm Happenin's

While I not-so-patiently wait for spring, there are some things around the farm that cannot wait.

Our entire homestead could use a real lesson on patience.

The garden is currently so saturated with rain that just trying to walk to the compost bin requires hip waders. The good news in all of this is that our formally compacted soil is nice and fluffy. Well, it would be if it would ever quit raining.


In rather embarrassing news, not a single one of my greenhouse seeds sprouted. I guess seeds need heat. Which I failed to provide. They also need light, which my youngest daughter decided to turn off. The positive side to this is that our local farmer's market opens in a couple of weeks and you can bet I'll be making a mad dash to the organic tomato lady's stand!
~ ~ ~ ~ ~ ~

We sold 2 of our goat triplets. Wynken and Nod are now happily living north of us on a small farm. These people love their animals so much that they bring their goats insides during the coldest nights! I love my animals, but.....

We helped load them up. Into the backseat of the new owner's sedan. As they we driving down our driveway, Wynken and Nod were standing on the backseat, hooves on the back, noses pressed against the window. If my Mister wouldn't have been holding my hand, I'd have chased that car clean into town.

Gertie and Blynken had a hard time adjusting to the extra room in their pen. They carried on non-stop for 2 days. Maybe it was separation anxiety. Maybe it was because of the triplet connection. Or maybe, just maybe it was because we finally got around to trimming the goats' hooves.
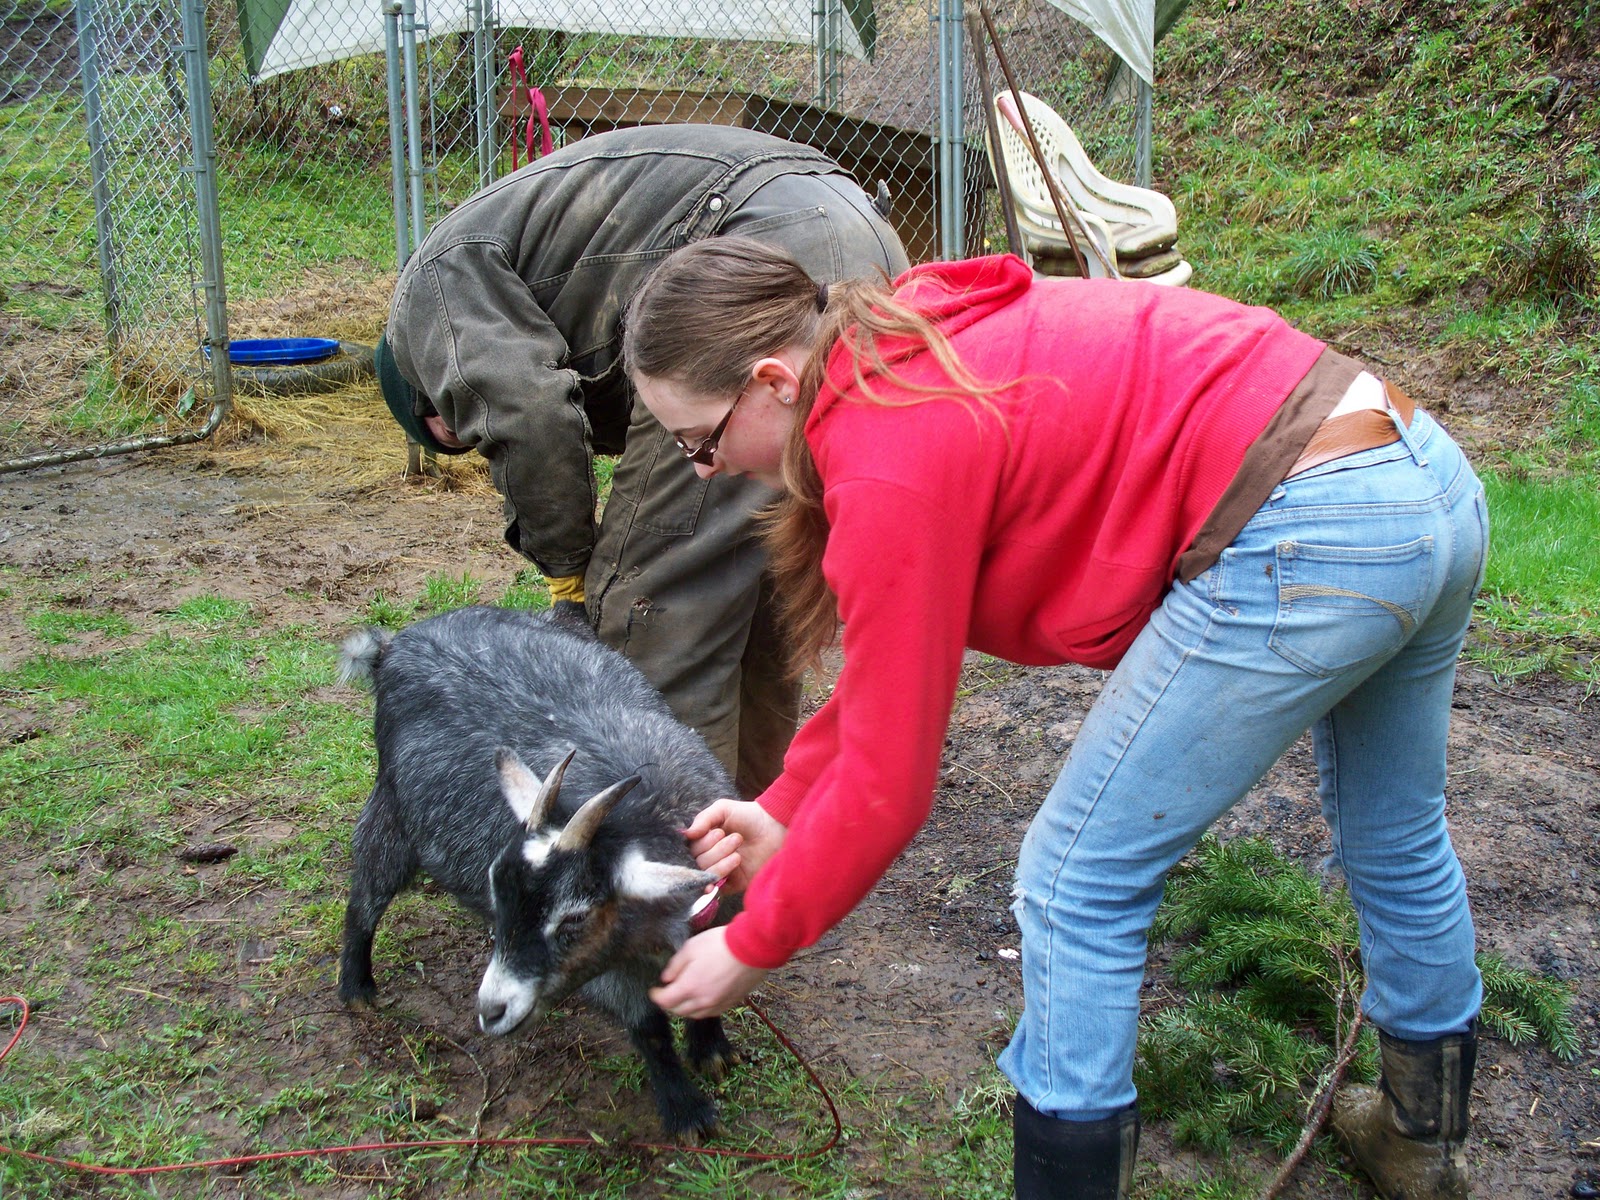

For the first time.


Ever.


And while Gertie wasn't the slightest big amused about her grooming session,


Blynken was just happy to have a new friend to play with.
~ ~ ~ ~ ~ ~

And finally, after months, no years, of discussing the benefits of having our own milk cow, we have decided to jump into the family milk cow arena.

Since we made the decision, I thought it would be easy to find the perfect Jersey cow. And, because it's spring, I figured that there would be cows popping out all over the place. I expected farmers to be lining up on our driveway, saying, "Take mine! Take mine!"  I also believed in the Hollywood syndrome that says to "replace the mature [cows]
 with the young up-and-comers".

Apparently the Hollywood syndrome only applies to humans. Not cows.

We did find 1 Jersey heifer however.


♥I'm head over hooves in love.♥

We're currently waiting (still!) to hear back from the owners. I'll keep ya posted on whether there's a road trip in our near future! ☺
I can almost taste the fresh, organic milk now....


This post is linked with the Barn Hop at Homestead Revival.

Tuesday, March 29, 2011

Blueberry French Toast Casserole


Mary Jane Butters, you've done it again.

Thanks to you, I had one little, tiny, almost insignificant slip-up on the whole gluten free thing.

Well, it would've been insignificant if I hadn't indulged in that second piece of glorious casserole. You know the one. It was the casserole that dreams are made of. Candle companies try to duplicate it's aroma, while an entire country tries to lay claim by depositing their name in the title.

Yep. That's the one.

Blueberry French Toast Casserole.

Thanks to you, mornings will never be the same again.


Blueberry French Toast Casserole
~courtesy of MaryJane's Farm magazine, April/May 2011 issue~

12 slices day-old bread (I used a rustic sourdough bread)
16 oz. organic cream cheese
1 cup fresh or frozen blueberries
12 pastured eggs
2 cups whole milk
1/3 cup pure maple syrup
Blueberry sauce~recipe follows

Cut bread into 1" cubes. Place half of the cubes in a buttered 13x9x2" glass baking dish. Cut cream cheese into 1" cubes and layer on top of bread. Top with blueberries and remaining bread.

In a large bowl, mix together the eggs, milk, and syrup. Pour over bread mixture. Use a spatula to press ingredients down into liquid.

Cover pan with foil and refrigerate 8 hours or overnight. Remove 30 minutes prior to baking. Preheat oven to 350F.

Bake, covered, for 45 minutes. Uncover and bake until top is golden brown and mixture is set in the center, about 25-30 minutes.

Serve with Blueberry Sauce.

~Blueberry Sauce~

1/2 cup organic sugar
1 T. organic cornstarch
1/2 cup water
1/2 cup fresh or frozen blueberries
1 t. ground nutmeg

Combine sugar and cornstarch in a small saucepan. Add water and boil for 3 minutes. Add berries and simmer until they burst, about 8-10 minutes. Stir in nutmeg. Drizzle syrup over entire casserole before serving.

Serves 12.

If you like this recipe, check out the newest edition of MaryJane's Farm magazine.


Monday, March 28, 2011

The Old Pepto Bismol Room Revealed!

Extra! Extra! Read all about it...

That's really how this post should begin. After our dearly departed daughter #4 moved out, we were left in a quandary as to how to redo her old room. See, DD#4, otherwise known as Melissa, really, really, really, really loves the color pink.

I mean really, really, really, really alot.

So much so that when she moved her belongings out, we were unable to enter the room without fear of losing our eyesight.


The Pepto Bismol Room. And lest you think I jest, dare to compare.


It was quite the conundrum.

After careful consideration and a lot of pondering, the Pepto room is now...


...The Truffle Room.


We put up 32" bead-board and painted it a chocolaty brown. The top is capped with new trim, but we re-purposed our old trim on the bottom.


My Mister built the bookshelves and desk. I painted them a cream color (the desk wasn't painted as of this picture) and then sanded it to make it look old. We picked up the pink baskets at Lowe's and used a garage sale chair that will be reupholstered soon.


The mirror, light and garbage can came from IKEA.

I love the Swedish.


The Swedish know that every princess room needs a chandelier, just in case she wants to dance.


Curtain rods are expensive, so we opted for copper pipe and end caps. By adding a little screw into the pipe, it keeps the pipe from moving around when the curtains are pulled.

And if we ever have a leak somewhere, we know where to go.


Add one hope chest and the Truffle Room is complete.


No safety goggles required.

Only one problem since Mandie has moved into her "new" room.


We can't seem to get her out of it!


☺

This is the kind of project we like to tackle during the rainy months. Spring will come all too soon and with it the busy-ness of gardening, animal care, fence building, mowing and other outdoor projects. The last place any of us want to be on a sunny day is indoors.

Until that day happens though, you'll find us working on yet another room.

Next up, the master bathroom!

This post is linked to The Barn Hop at Homestead Revival.

Sunday, March 27, 2011

Menu Plan for 3/28/11


Spring break.

Two words that make me weak in the knees.

After chocolate and peanut butter, they are my two new favorite words.

This is the one week of the year that I get to relax. The week that I get to work on some of my personal projects. The 7 days that I can read a book...from start to finish, work on a quilting project...just because, sew a new apron...in pretty spring colors, plant some flowers with my kids...because it finally quit raining, or watch a movie trilogy, 3 days in a row...because the rain hasn't stopped at all.

The 168 hours that are destined to recharge the momma bear's batteries.

 10,080 minutes spent with the children who will suddenly have nothing to do.

604,000 seconds of wondering if this ridiculously long week will ever end.

Oh my goodness! Help me! It's spring break week!!

I wonder if it's too late to change my mind? ☺

Here's what's cookin' this week...

~Monday~
Blueberry French Toast Casserole (new)
Veggie Burrito Bake w/ Sourdough Tortillas, salad (carried from last week)

~Tuesday~
GF Lemon Poppy Seed Muffins, Yogurt Smoothies
Salmon Fish & Chips, baked cowboy fries, salad

~Wednesday~
Scrambled eggs & bacon
Mediterranean Citrus Chicken (new), Sweet Corn & Walnut Risotto (new)

~Thursday~
GF Cranberry Orange Muffins, Yogurt Smoothies
Grilled Hamburgers (the weatherman promised sunshine with a little warmth!), Brown rice Pasta Salad

~Friday~
Oven fried chicken thighs, baked potatoes, steamed broccoli/cauliflower

~Saturday~
GF Blueberry Lemon Muffins, Coconut Milk Smoothies
Corn Casserole, salad (or grilled asparagus if I can find some USA grown!)

~Sunday~
Cold cereal
Buffalo Chili w/ Lime Sour Cream (new), tortilla chips

For more meal planning ideas, visit Menu Mondays at Organizing Junkie!


Saturday, March 26, 2011

GF Spiced Apple Bundt Cake


I cannot express to you, in words, the joy that I feel when a recipe turns out. Especially when it's a recipe that has ingredients that are not the norm for me to use.

And most especially when the ingredients have garbanzo/fava bean flour in them.

I'm not sure what I was expecting exactly. Maybe a burrito type flavor, minus the flavor, perhaps? Or a tahini base without the sesame?

You're surprised that I know what tahini is, aren't you?

What I got from this cake experiment was nothing short of miraculous. It was light and fluffy, extremely moist and sweetened just enough with the glaze on top.

The only thing missing from my gluten-free cake experience was a pot of fresh decaf.

Which is currently brewing right now.

Guess what I'll be having in about 13 minutes! ☺

Gluten-Free Spiced Apple Bundt Cake
~from Gluten-Free 101~
Remember to use organic ingredients as much as possible.

~The Players~

2 t. xanthan gum (found in health food stores and Bob's Redmill)
1-1/2 t. baking soda
1 t. sea salt
1-1/2 Tb. ground ginger
1 Tb. ground cinnamon
1/2 t. ground nutmeg
1/4 t. ground cloves
1-1/2 cups milk
2 cups brown sugar, packed
3/4 cup unsalted butter
1/2 cup Barbados molasses (not blackstrap)
1-1/2 t. vanilla extract
2 large pastured eggs, beaten
1 large Granny Smith apple, peeled and grated
1/2 cup chopped walnuts

Preheat oven to 325F. Generously grease (butter) a 10-inch Bundt pan.

Sift together flours, xanthan gum, baking soda, salt, ginger, cinnamon, nutmeg, and cloves in a large mixing bowl.


Always measure spices into a small bowl first. Putting the spices away as you go keeps you from wondering whether or not they were added already! Or so I've heard...☺

Combine milk and brown sugar in a heavy saucepan and bring just to boil over medium heat. Remove from heat and add butter, molasses and vanilla.


When butter is melted, add butter and sugar mixture to flour mixture in mixing bowl and mix until thoroughly blended.


 Add eggs, grated apple and nuts and mix until blended.


Pour batter into prepared pan. Bake 60 minutes, or until toothpick inserted in center of cake comes out clean. Cool cake in pan for 5 minutes. Invert cake onto rack to finish cooling.

Glaze with *Vanilla Glaze if desired.

Serves 12.

*Vanilla Glaze

2 cups powdered sugar (I used organic)
1/3 cup unsalted butter, melted
1-1/2 t. vanilla
2-4 Tb. hot water

Mix powdered sugar, butter and vanilla. Add 2 Tb. hot water and whisk until lumps are gone and glaze has the consistency of real maple syrup. Add more hot water as needed. Poke holes into cake with a toothpick or skewer and pour glaze evenly over top.

Enjoy!

This recipe is linked with Sweets for a Saturday.


Thursday, March 24, 2011

A Versatile Gluten-Free Flour Mix


A few months ago, I attempted to go gluten-free. The experiment ended rather abruptly when I decided to make some sourdough bread.

Some people think my middle name is Sue. It's actually Saboteur.

Which basically means that I'm my own worst enemy.

Now, due to some tummy issues with my Mister, we're giving gluten-free another try. This time, I'm not alone. Hopefully that will mean I can withstand the sourdough bread test.

Or at least have someone to slap my hand if needed.

Besides giving up my beloved bread, another obstacle was trying to find "treats" to satisfy the sweet tooth. Sure, there is always fruit, but sometimes a gal just needs to bite into a piece of chocolate cake. Or a banana muffin. Or a snickerdoodle. Or.....

See the problem?

For the next little while, I'll be sharing at least one gluten-free recipe a week. I'm calling it the "His Gut, Her Butt Diet". (This does not require a visual aide. Just an imagination.)

Today is all about the mix that can be used in many recipes. Giving up bread doesn't have to mean that you are giving up fiber. By using a bean flour in the mix, you're boosting your fiber and protein intake without sacrificing flavor. I also try to stay away from soy. Sometimes it's easier said than done because it seems to be hidden in everything. In fact, I bought two different GF baking mixes last time around and both had soy in them. But those were my only options. I wasn't confident enough to search out other mixes and didn't know where to start when making my own.

This baking mix is courtesy of a GF book I found in our local health food store. It's called, Gluten-Free 101  and is full of really easy recipes.

I guess that's what the 101 stands for. ☺

Gluten-Free Flour Mix
~The Players~
3 cups sweet sorghum flour
3 cups potato starch (can use cornstarch)
2 cups tapioca flour
1 cup garbanzo & fava bean flour (can use almond flour or corn flour instead but it will lower the protein and fiber content)

Measure flours very carefully, leveling off with a butter knife.

Mix together in a large bowl.


Put into a large container, such as a gallon-sized jar. Store in a cool, dry place.

Tomorrow I'll share a recipe for a Spiced Apple Cake. No one will ever guess that it's gluten-free!

Maybe it will even fool me! ☺

Tuesday, March 22, 2011

Creamy Scalloped Potatoes


Some things just go together~cheese and crackers, peanut butter and jelly, strawberries and cream, and biscuits and gravy to name a few. When I was planning our menu for the week and chose ham for one of the meals, I knew that scalloped potatoes had to join our Monday meal too.

When I was a little girl, scalloped potatoes always went with ham. Of course, we didn't have ham often, but when we did, it was the creamy potato casserole that we were anticipating, not the pig.

Probably because Charlotte's Web was such an integral part of our growing up years.

The thing I remember most about my mom's scalloped potatoes was the cream of mushroom soup that got dumped over the whole dish. The funny thing about aging is that sometimes you gain wisdom during the  growing process.

Sometimes.

As an adult, I now know that store-bought cream of mushroom soup is loaded with garbage that I don't want. Remember, MSG is not an ingredient, it's a toxin. And don't even get me started on the other "ingredients". If I can't say them, I can't eat them. Period. (I posted a homemade Cream of Mushroom soup here.)

My mission, if I chose to accept it, was to come up with an equally delicious, creamy potato dish, reminiscent of the scalloped spuds of my youth.

I like a good challenge almost as much as I like a good potato dish. ☺

Creamy Scalloped Potatoes

~The Players~

4 lbs. organic potatoes (yellow, red, purple, russet~your choice)
1 (8 oz.) cream cheese, softened
1 cup Greek, plain yogurt or sour cream
1 cup whole milk
1 cup Swiss cheese, grated
1/2-3/4 cup Parmesan cheese, grated
2 t. dried tarragon
1 Tb. dried parsley
1/2 t. onion powder
1 t. (or more to taste) sea salt
ground pepper

Using the slicer attachment on a food processor or mixer, slice the washed (and peeled if desired) potatoes. Put the sliced potatoes into a large stainless or plastic bowl and cover with cold water.


Let potatoes soak for 1/2 hour to remove excess starch. Drain in a colander.

Grease a 13x9" baking dish and lay half of the potatoes in the dish. 

In a mixer, beat the cream cheese and yogurt/sour cream together until smooth. Add the milk and mix well; scrape the bowl as needed. Add the cheeses and spices.

Pour half the cheese mixture over the potatoes. Add the remaining potatoes and cover with the rest of the cheese sauce. Sprinkle with paprika.


Place tin foil over casserole and bake in a preheated 375F. oven for 45 minutes. Remove foil and bake 15 minutes more, or until potatoes are soft.  

Serve immediately.

Maybe with a nice ham?

Enjoy!


Monday, March 21, 2011

Canning Homemade Stocks


With the recent catastrophic earthquake and tsunami in Japan, my Mister and I decided that we need to be better prepared for when the next "big one" hits. Living near the Pacific Ocean (less than an hour), we are constantly being reminded that it's only a matter of time before the fault lines shift and we could be looking at the same kind of devastation as Japan.

I know that we're not as ready as we would like to be.

The likelihood of us taking in displaced neighbors and family is pretty high; we have a large house and my Mister is an emergency nurse. Our house also sits high up on a hillside. We preserve most of our food and are accustomed to buying in bulk. If I were running away from a large amount of water or needing to hole up somewhere to wait things out, I would run to a place much like ours.

Good for the neighbors, but it means that we need to think BIGGER.

I'm not a pessimist. I'm an optimist with life experience.

So, what do we start with? For one, we are going to start cleaning out the freezers. A generator can only keep the freezers running as long as the gas supply holds out. I'll be using some of the fruits in jams that can be canned. Some of the meats will be made into soups and chili, and will end up on the pantry shelf. And the broths that I have been freezing will from now on be nestled in next to the canned beans.

Canning broth is simple. It does require a pressure canner, so if you don't own one, I suggest this be something you purchase in the near future. As a homesteader, this is one of our basic necessities. In the event of a power outage, we can use the pressure canner on a propane camp stove if needed. A pressure canner must be used to preserve any food that has a low acidity. Most fruits can be canned in a water bath canner, but meats, fish, most vegetables, soups/stews/chili, and broths need to be pressure canned. Without it, sickness can occur.

There are a lot of methods for canning broth out there, but I'm using the Ball Blue Book method, which has the most recent updates.

Here's how...

Prepare your broth. If you're new to making stock, here's how I make my beef stock. Chicken stock is similar, but I use the stove and a large stock pot. It also takes less time; anywhere from 12-24 hours.
Chicken stock on the stove

After cooling and straining the broth, pour back into the stock pot. Heat to boiling; turn down heat to simmer.

Pour hot broth into clean, HOT jars. Only do what you have room for, leave the remaining broth simmering on the stove until ready to can.


Add sea salt if desired. I use 1/2 t. for pints, 1 t. for quarts.

Wipe the rims with a towel.


Place hot lids on jars, screw down tight with metal rings.

Put jars in a pressure canner.


Some pressure canners are double stacking. If you are in the market for a canner, I highly recommend one of these; it saves a lot of time.
Double stackers come with a separator


Pour 2-3 quarts of very hot water into the canner. Place lid on top and tighten down.

Follow the manufacturer's directions for using your pressure canner.

Bring the pressure up to 10 lbs.; process pints for 20 minutes, quarts for 25.

Turn off heat and let the pressure fall back down to 0. It's very important to not open the pressure canner until all of the pressure is gone. Before opening, remove the shuttlecock to make sure that it's all out. (Only when the gauge reads 0.)

Remove hot jars from canner; place in a draft-free area on towels. Cover with a towel and allow to cool slowly. The lids will start making popping sounds to show that they are sealing.

I love it when my jars talk back!

Make sure to label the jars with the flavor of stock~chicken and beef stock can be very similar in color, depending on the length of time it cooked and the ingredients used in the stock.


I don't salt all of my stock, so I make sure to label the ones that I have.

Store in a cool, dark place. 


This post is linked to the Homestead Barn Hop
and Carnival of Home Preserving at Laura William's Musings

Sunday, March 20, 2011

Getting Back on Track with a Menu Plan


After the craziness of last week, I'm ready to get back into the swing of things.

However, if today is any indication of where the rest of the week is headed, I'm in a bit of trouble.

After church, I decided to take the kids to the pet store so that Matthew could pick out a couple of new guppies for his tank. Boogar, his 2 year old beta fish finally passed into the great beyond and is happily sailing into the everafter with those that have gone before him. Okay, he was flushed down the porcelain throne and is decomposing in our septic tank, but that just doesn't sound very calming to a distraught 10 year old who believes that Boogar was the best fish "ever".

While waiting for the fish specialist, who I'm fairly certain is also a grocery cart specialist at another store, Matthew had the opportunity to observe many different kinds of fish. With the help of his siblings, he finally settled on saltwater fish.

For a saltwater tank.

Not a gallon-sized, bottled water kind of tank.

After calmly talking him down from his fish meltdown, he chose a couple of neon tetra's.

Then he decided on a miniature shark, followed by some kissing fish, catfish, and molly's.

We went in there for some guppies. Just plain old guppies.

Finally, with a little persuasion, we left with two yellow molly's. 

It took an hour.  

On the way home, Matthew, who was sitting in the third row seat, decides to ask me "facts of life" kind of questions. (At least that's what I thought he was asking in my dazed and confused state of mind.)

Did I mention that he was in the third seat behind me?

"Momma, how do fish breed?"

Because I did not know the answer to this question, nor did I care, I replied with, "Well Matt, it's really none of my business how or what fish do in the privacy of their own tank. Fish breeding is not something that I spend my time thinking about." (Google wasn't an option~when trying to determine whether our daughter's cat was a he or a she, we googled "Cat Genitalia" and haven't been the same since. May cost more, but the vet is the only way to go for these kinds of questions!)

I glanced into the mirror to see if he was going to be okay with that answer only to see his face scrunched up, mouth wide open and a look of total disgust staring back at me.

"Ewwww!! I asked how do fish BREATHE, not breed!"

Yep, it's going to be one of those kind of weeks.

Here's what's cookin' this week...

~Monday~
Corndog muffins, apple slices w/ vanilla yogurt
Baked ham, scalloped potatoes, green peas

~Tuesday~
Chicken Noodle Soup (homemade sourdough noodles), Sourdough bread

~Wednesday~
leftover Chicken Noodle soup
Polenta (new recipe), Barbecued Meatballs, Creamed Spinach
~Thursday~
Simple nachos (cheese, black beans, sour cream, green onions, salsa)

~Friday~
Breakfast Burritos (new) (using leftover sourdough tortillas)
Homemade Creamy Tomato Soup, sourdough bread
Risotto, fried deer steak, Caesar Salad

~Saturday~
Maple Walnut Scones, Orange Julius's (homemade & new)
Roasted Chicken, mashed potatoes & gravy, Caesar Salad

~Sunday~

I'll let ya know how the rest of the week goes!

For more menu planning ideas, visit Menu Monday at Organizing Junkie.


Friday, March 18, 2011

She's Finally Here!!

After months of waiting, guessing, hoping, and praying, Emily Jane has finally made her big debut.

5 minutes new

I can already tell that she's going to be a real troublemaker.


On Tuesday, March 15 at 6:30 a.m., Emily committed her first crime.

Poppa & Emily

She stole our hearts.

Nana & little Emily

And we...

"I'm a big sister now!"

...will never...

Mommy "helping" Maddie kiss her baby sister for the first time

...be... 

Gramma Debbie & Emily

...the same...

Grampa Jerry & baby Emily
...again.

Great Gramma J. having a "chat" with her newest great grandbaby

Proud new daddy~Round 2!


Precious jewel, you glow, you shine,
reflecting all the good things
in the world.

~Maya Angelou~

Welcome to the world Emily Jane!