Tuesday, January 1, 2013

A New Year

2013. A new year. For some, a new start. For others, an opportunity to practice the fine art of correcting mistakes.


I don't know about you, but I fall into this category. Call it brain fog, old age, or denial that time's-a-flyin', but I'm not a lover of change. As with any new year, change does come. It must or we fail to grow.

Over the last few months, my blog is one thing that hasn't really grown. Not because there aren't people reading it, but because I haven't had the energy, time, or inspiration to put into it. I contemplated closing this blog and devoting my down time to napping and watching old Malcolm in the Middle reruns, but after a month of that, it got old. So, with this new year, I won't be focusing on resolutions that are made to be broken. I'll be focusing on goals. On growth.

And on getting myself off of the couch.

The pity party is over. No more woe is me attitude. Life is what it is. You learn to adjust and adapt. You grow and hopefully inspire others by just living life in all its glory...to the fullest.

Here are some 2012 2013 goals I have:

For the farm


1. Downsize our farm. *Gasp!* (Did I just say that out loud?) We have too many free-loaders that are costing us big bucks in the feed department. At least half of the chickens and all but 4 of the turkeys will be heading to freezer camp, as will our 14 year old arthritic cow, Bailey.

2. Butcher the hogs. Those once cute little piglets have turned into 170-266 lbs. of ravenous, dirt-plowin', eating machines. And quite honestly, they scare me. Especially Porky, who is our largest and most aggressive eater.


3. Repair/replace water lines at the barn. The pigs decided to turn their once dry pen into a spa-like environment by rooting up the water lines which caused their home to flood. Of course, they did this while the Mister was in the middle of his work week. For now, our water comes from a waterfall behind the barn and is hauled with buckets. Can't really get more homesteady than that.

4. Start our tomato seeds by the end of January. This is a goal I make every year, and every year I forget to order the seeds in time. Not this year. This will be the year of tomatoes. Which reminds me that I need to place my seed order in the mailbox...

5. Help the Mister build a hoop house. By help, I really mean nag-until-it-gets-done. Because really, I am not a very good hoop house builder.


My pathetic attempt is still sort of standing. In a leaning-to-the-East kind of way.

For the home/kitchen


1. Repurpose. This is a big one because I have a lot of ugly old junk. Dressers, tables, even old lamp bases are going to get an overhaul. I plan on getting to know the paint people at Lowe's very well.

2. Spend more time in the kitchen. Yes, I'm weird that way. Fact is, I love my kitchen. I love my pots & pans. And I especially love to get creative. Expect lots of new recipes this year. And thanks to my children, better pictures with the new camera they bought me for Christmas.


3. Organize. In the next month or so, the last of our adult married children will be moving into their new home. While it has been so fun having the rooms full again, I have realized just how unorganized I really am. The first project on the list: Get rid of all the homeschooling supplies I no longer need so I can repurpose some of those bookshelves into a functional pieces of furniture.

4. Learn to make hard cheeses. Is it just me, or do cheese presses look like something from Medieval times? And how come every single cheddar recipe out there is different than the one before? Is it because there's lots of room for error or because no one wants to admit that their cheese-making adventure was an epic fail? Oi.

For our homeschool


1. Update transcripts. I have an entire year of grades still on paper. Since we have a senior this year, I need to get on this pronto.


2. Plan ahead. I'm a fly-by-the-seat-of-your-pants-and-hope-you-land-on-something-soft kind of gal. Some would call it "unschooling," I just call it procrastination. We will still have a more laid back school year, but I need to be better prepared for all of the "what's next" questions.

3. Graduate Mandie. Even if I'm not emotionally ready to do so.

For me


1. Be quick to forgive. It's getting easier with age, since I don't really remember most of the day anyway, but I want to be a purposeful forgiver. Life's too short to waste being angry or hurt by words said in the moment. Let it go.

2. Continue to heal. Right now I am reading the book, "Autoimmune, The Cause and the Cure." (Review to come.) I'm lacto-fermenting veggies, drinking raw milk kefir, kombucha, and avoiding all foods that cause an inflammatory response. I'm walking more, listening when my body says to rest, and letting go of the things that I cannot change. Like my height. And how fast my leg hair grows.

3. Be patient. Because all good things come to those who wait. Just as I waited 44 years for a milk cow, I can wait for those moments when my patience is rewarded.

4. Listen more. Let my actions speak for themselves. And dear Lord, let my actions speak only good things. And my temper tantrums be behind my closed bathroom door.

5. Enjoy every single moment. Every breath. Every joy. Every tear. Even the tears that come from sorrow. Because in our sorrow, there is life. It means that we are feeling. That we are living. And that we are loving.

Happy New Year, from my home to yours!


2013~Bring it on!

Wednesday, November 28, 2012

The Collector

I am a collector.

I wish I could say that I was a collector of vintage jewelry, fine wines, or antique gadgets, but alas, it is not that glamorous.

I am a collector of auto-immune diseases.

I am now up to three.


If I were looking at the glass as half-full, I would say, "Well self, you have a good eye for collecting." (Only 1 good eye though. The other has a scar across the pupil. Kind of worthless. Except it balances my face out.)

Right now my half-full glass is lying on the kitchen floor, not shattered, but slightly chipped. I'm down, but not out.

Okay, a little out. The latest disease process requires a low-dose chemotherapy treatment. (I do NOT have cancer. Promise.)

Which makes me a little sick and tired.

The four pages that came with my "therapy" pills left my mind reeling with all of the warnings. All of which followed the first.

This product could cause death.

Anything that isn't death would fall into the glass is half-full category. At least for me.

I'm not looking for sympathy, I just felt the need to share why I've been a little absent from blog-land. Life is always busy, but now when I have a moment to relax, I do it behind closed eyelids. And with the Christmas season upon us, closing my eyes may be a luxury that will have to wait until the New Year.

Except by then, I plan on being completely healed.

Half-full, baby.

Sunday, November 25, 2012

Farm "Flowers" and a Cocoa Mix Recipe

After an amazing Thanksgiving holiday, it's time to get back in the saddle.

If I had a saddle anyway.

Of course, then I'd need a horse too. Maybe I should just say, "It's time to get back into the routine of normal life."

But then, I'd have to define normal.

Monday may be harder than I expected.

Thanksgiving for me is an excuse to overeat. Because apparently, a person is only allowed to have roasted turkey, cranberries, stuffing, and pumpkin pie once a year. I think it's a law or something. So I indulge. Which leads to guilty days spent lying on the sofa, wearing dirty yoga pants, and watching Christmas movies on Lifetime. It's only on Sunday when I awaken from my turkey-induced stupor and begin to function again.

Since I had worked so hard on our Thanksgiving dinner, my Mister decided to bring me home the farmer's equivalent of a bouquet of flowers.


Meet Flower. He's a rooster. As in, a boy chicken. And yes, that is my kitchen table and I am inserting a little sarcasm here. (Because we now have 6 boy chickens.) Flower was living a life of luxury in town when his owners discovered his incredible singing talent. Since town-dwellers are only allowed 3 hens inside the city limits, Flower had to go.

Somehow, he ended up here. As my gift. My Mister is either a softie at heart, or he just gets me. Chickens, cows, and chocolate...that's all I need.

Speaking of chocolate...

I love it. Especially hot. What I don't love is all of the ingredients on the can of mix. For the life of me, I cannot figure out why partially hydrogenated anything should be in cocoa mix. It makes about as much sense as the anti-caking chemicals they also add. Seriously? Is caking cocoa really a problem? Could it be because there is hydrogenated fats in it?

Hmmm....something to ponder.

Before you go and buy another can of chemically-laden hot chocolate mix, give homemade a try. And because there are only 5 ingredients in this version, I'm calling this a health food.☺


  ~Hot Chocolate Mix~
 
The Players
 
1 (26 oz.) bag of Bob's Redmill Non-fat Dry Milk Powder
~or~
5-1/2 cups dry milk powder of your choice
1-1/2 cups organic sugar
1 cup unsweetened organic, fair-trade cocoa powder
1/2 cup mini chocolate chips (I get organic in bulk at Whole Foods.)
1/4 t. sea salt
 
Into a large bowl, mix all the ingredients. Put 1/3 of the mixture at a time into a food processor and pulse until chocolate chips are powdery. (They will cease to make that obnoxious racket that chocolate chips in a food processor does!) Pour mixture into another bowl. Continue to process 2 more batches until all of the mix is done.
 
 
Pour into a lidded canister or jar.
 
To make cocoa: Add 3 tablespoons of cocoa mix to a cup of hot milk or water. Stir well.
 
Don't forget the whipped cream!
 
Enjoy!

This post is linked to The Homestead Barn Hop.

Thursday, November 15, 2012

DIY~Wool Dryer Balls


A few months ago, the Mister and I attended our 2nd Mother Earth News Fair. While we enjoy listening to our favorite farming "peeps", we also enjoy perusing the different vendor booths, dreaming about all the things that could make our lives easier if only we were millionaires. One vendor that we especially liked was selling all kinds of green laundry supplies, most of which I already did. Except one.

Wool dryer balls were created to take the place of toxic dryer sheets. Made with 100% wool yarn, they help to eliminate static cling, decrease drying time, and keep your towels and unmentionables properly fluffed. But, at $21.00 for a set of 4, buying them just didn't make economical sense. So, I googled it.

You should know that there are literally hundreds of posts dedicated to the making of dryer balls. Either people have entirely too much time on their hands, or they balked at the high prices as I did. For me, it is a little of both. I have a really difficult time watching television and not doing something else at the same time. Maybe I'm just too ADHD to sit still for an entire 2 hour flick. Or maybe it's because I know that my restless hands drive my family nuts.

That's probably it.☺

Making wool dryer balls is easy, and for $10 (or less), you too can have your own 4 fancy balls to toss in the dryer.

And if you're as fortunate as I, your family will burst into fits of giggles when you ask, "Where are my balls?"

I really need to get a life.

Here's what you'll need:

1 skein of 100% wool yarn (Make sure it is NOT machine washable or the yarn will not felt.)
1 nylon stocking (I use cheap knee highs.)
1 tapestry needle
acrylic yarn (for tying)

Start by wrapping yarn around two fingers several times.


Remove the yarn from your fingers, turn the loops sideways and wrap a few more times.


Now fold this in half and continue wrapping, turning often to make a ball.


Continue to roll until the ball is 5-6 inches in circumference. Cut the yarn, leaving a 6-inch tail.


Thread the end of the yarn through a tapestry needle and draw the end through the ball.


Tie into a knot by looping around 1 strand of yarn. Cut off the tail or tuck back into the ball. Place the ball into a nylon stocking and push to the bottom. Tie off the stocking just above the ball with a piece of acrylic yarn. (Don't use wool yarn for this, you don't want it to felt.)


Make 3 more balls, adding each one to the stocking and tying off.


Place the balls in the washing machine and wash on hot with no soap. When finished, toss in the dryer and dry on high heat.

After the balls are dried, untie the yarn and remove the balls from the stocking. Increase the size of the balls by adding more yarn until the balls are approximately 9-inches around. Tie off as before and return to the stocking. Again, wash on hot with no soap, and dry on high heat. If you want, you can repeat the wash/dry cycle for a third time. You don't have to; the balls will continue to felt as they are used.

The dryer ball on the right is new; the one on the left has been in use for a few months.
 
To use, place a minimum of 4 balls in the dryer per load. (I use 8 for large loads.)


Just one word of caution when making these~don't, I repeat don't ever watch a movie with high adrenaline action, such as "The Amazing Spiderman." You may find your balls rolling half way across the living room...

 ...while the family comes up with more reasons to giggle.☺

This post is linked to Farm Girl Blog Fest at Fresh Eggs Daily.

Sunday, November 11, 2012

Cleaning & Curing Walnuts

(Photo credit)
I like nuts. Of course, I'm from a long line of nuts, so it figures I would like some of them. But I'm not talking about those nuts, I'm talking English Walnuts.

English walnuts are high in omega 3's, vitamin E, and minerals such as; manganese, copper, iron, and selenium. They have been shown to help lower LDL levels of cholesterol, are high in protein, and are a rich source of anti-oxidants.

But that's not why I like them.

They're just delicious. Besides adding walnuts to baked goods (especially chocolate chips cookies!), I like to substitute them for pine nuts in pesto, toast and add them to sauteed veggies, and sprinkle on top of ice cream. For the holidays, my family likes walnuts that have been dipped in chocolate and sprinkled with coarse sea salt for a treat.

Last week, we had the opportunity to pick walnuts with some family members. I was so excited about picking the nuts that I forgot my camera, but don't worry, I'll create a visual for you...

Imagine 6 adults, bent over in a cow field, chucking nuts into 5 gallon buckets, for 2 hours straight.

No pictures needed. You're welcome.☺

When picking walnuts, it's important to wear gloves. Since we were in a cow field (complete with very large Holsteins that looked like they had been zapped by growth hormones), we also wore boots. Depending on the weather, the walnuts start to ripen and fall from the trees in October and November. Most of the nuts that fall still have some of the husk (that has turned black) on them.

(Photo credit)
Once on the ground, the husk gets a little slimy. Apparently, this is completely normal and probably the real reason for the gloves.☺ We came home with approximately 80+ pounds of nuts.

Before the nuts can be cured, they first must be washed.


The nuts are then dried with a leaf blower, because that's how my father-in-love rolls...
 

before being picked through to look for any that are open. Those are discarded because:
 
1. They were in a cow field. With cows. And poop. 
 
2. They make great condo's for insects looking to get out of the weather. Extra protein, yes. Appetizing? Not at all.
 
To cure the walnuts, we spread them out on old window screens that were placed near the woodstove.
 

And to detract dogs and kids, we put those screens up on drying racks.

 
The walnuts should be ready in 3-7 days, after which they'll be stored in gunny sacks until needed.
 
 
Until then, I'll be practicing patience. It is a virtue, you know.☺
 
 This post is linked to The Homestead Barn Hop.


Tuesday, November 6, 2012

Home Remedies~Elderberry Syrup


Every summer, I tag all the elderberry trees on our property, with the hopes of harvesting some juicy  purple berries in the fall. And every fall, I'm disappointed to find that the deer have beaten me to the harvest.

Those deer are a sneaky bunch.

I know that the deer are the culprits because I've become very adept at tracking. Not footprints. But poop. Specifically, purple deer poop. And I'm pretty certain that our deer population is much healthier because of those berries.

Elderberries are known for being high in antioxidants. They are also packed with vitamins, A, B, and C, and are great for boosting the immune system. Fresh berries can be used to make jams, jellies, and wine. Dried berries are great for adding to baked goods, or rehydrating and making syrup.

Elderberry syrup has been used for medicinal purposes for hundreds of years. Taken at the onset of a cold or flu, elderberry has been shown to reduce the length of illness. Some people even take the syrup on a daily basis to keep their immune systems strong during cold & flu season.

And since "The Crud" has decided to pay our house a visit, I decided to take some action before the Mister gets it.

Because there's nothing worse than a man-cold. (Click here to see for yourself.)

I owe it to my family to keep that from happening.☺

 
~The Players~
 
2/3 cup dried elderberries (I purchase mine here.)
3-1/2 cups filtered water
1-inch piece of fresh ginger root, peeled
2 sticks of cinnamon
8 whole cloves
1 cup raw honey (as local as you can get it)


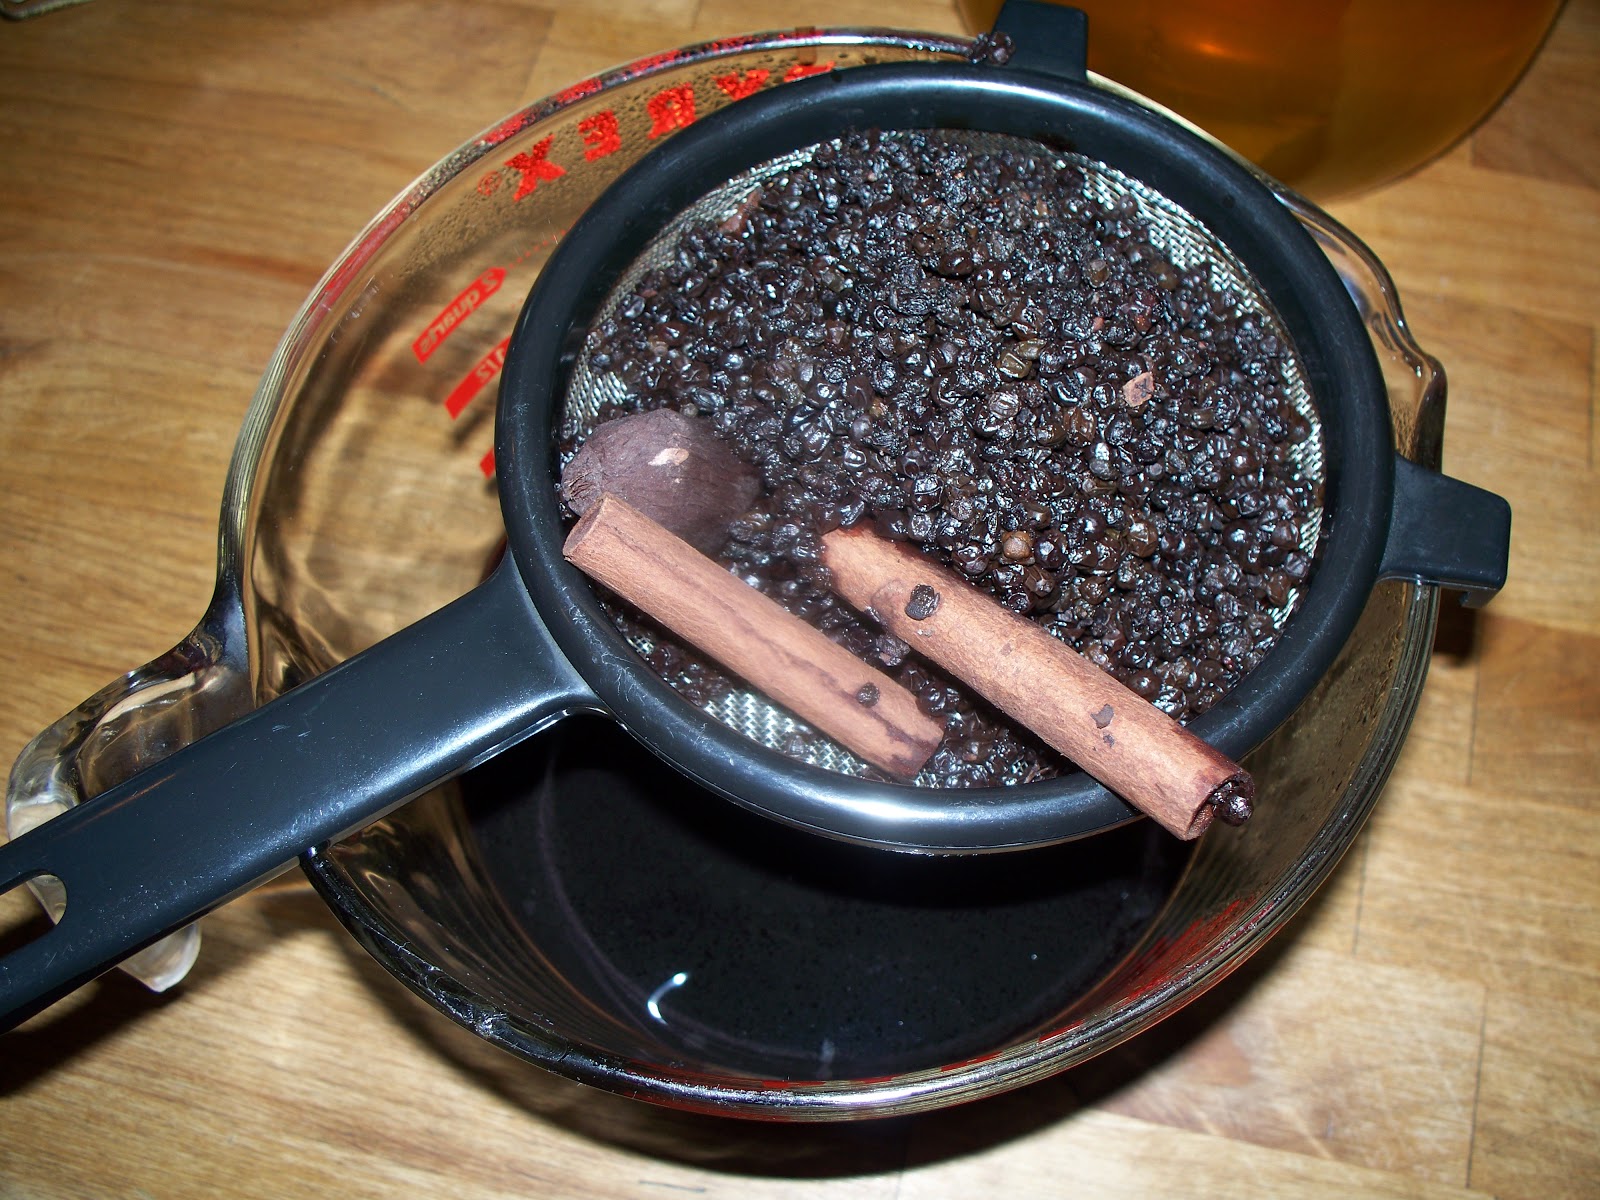
Pour water into a medium saucepan and add elderberries, gingerroot, cinnamon sticks, and cloves. Bring to a full boil; cover, and reduce heat to simmer. Let the mixture simmer until liquid is reduced by half. This will take approximately an hour to 90 minutes.
 
 
Remove from heat and strain through a fine-mesh strainer. Allow the liquid to cool to lukewarm.
 
 
Add honey to cooled mixture and stir well to combine. Store elderberry syrup in a glass bottle or jar in refrigerator.
 
I give 1 teaspoon, 3x's/daily to my children. (For kids under 6, I would give 1/2 teaspoon.) The Mister & I dose up with 1 Tablespoon, 3x's daily.
 
*Never give raw honey to any child under the age of 1.


Sunday, November 4, 2012

It's All About the Butter

There was a time when I didn't understand this well-known quote from Julia Child. While growing up, I thought that margarine was butter, and cream came from the freezer section with mini-marshmallows and nuts in it.

In my 20's, I learned that there was a difference between butter and margarine, which had nothing to do with nutritional value. It was all about the finances. As a young married couple, margarine was cheap. I remember buying a particular brand that cost a mere $.39/lb. That was an entire box! For 39 cents! And I could add it to our 25 cent carton of macaroni & cheese. We were poor, and it was ignorant bliss that we chose to stay in until much later.

At the turn of the 20th century, heart disease was unheard of. And everyone ate butter. Because margarine didn't exist. (Neither did soybean oil, but I'm not opening that can of worms today!) It wasn't until some dude in the 1960's declared that saturated fat caused heart disease, and the ban on butter began. Even though, up until this point, every home in America had been using butter, much of which was made right at home. And if butter is so bad, why hasn't the rate of heart disease decreased with the increased use of low-fat, butter-like psuedo spreads? Maybe because butter, by itself, is not the culprit of clogged arteries and coronary heart disease?

I wish I would have known how easy it was to make butter earlier. It takes only minutes, and doesn't require that you have a family cow or a special churn. Homemade butter is best when used fresh, but it can also be frozen for up to 2 months if wrapped in waxed paper and placed in a freezer bag. (I freeze in 1/2 cup servings so it's easier to use in baking.)

And don't let fear of butter stand in your way...

...start with the cream.

That Julia Child was a smart lady.

There are a couple of ways to make butter at home. First, start with some heavy whipping cream. This can be fresh from the cow, or bought from the grocery store. Just try to find cream that has not been ultra-pasteurized and is organic if at all possible.

Method #1~

Pour 2 cups heavy cream into a wide-mouth quart jar. Place a piece of plastic wrap over the jar, then secure with a screw-top lid.


And shake.


*See below for next step.

Method #2~

Pour cream into mixing bowl with paddle attachment.


If your mixer has a splash guard, use it, otherwise you can just place a towel over the mixer.


Turn the mixer on medium-high and let it run until the butter has separated from the buttermilk.


*For Method #1 & #2~Using a strainer, pour the buttermilk off. (Save it for the chickens, pigs, or use it in a recipe.)


Put the butter back into the bowl and pour some ice water into it. I use the strainer to keep the ice out of the butter.
 

Using the mixer with the same attachment, turn it on the lowest setting and allow water/butter to swirl around for about 15 seconds. Pour off the water. You can add salt now, if desired. (I only add salt if we're going to put it in the butter crock.) Use a wooden spoon to press out any remaining water, before transferring the butter to a covered glass container. Store in the fridge until ready to use, or in a butter crock for soft butter.


Now I need to find some biscuits...☺

This post is linked to The Homestead Barn Hop.