Showing posts with label Remodeling. Show all posts

Sunday, October 9, 2011

Curve Balls & Faith


Sometimes life throws little curve balls. And for someone who was never one to throw anything other than a temper tantrum, curve balls can rock a farmgirl's world.

And sometimes, curveballs can knock a farmgirl right into a happiness that she never knew existed.

I've eluded a couple of times to our recent remodeling extravaganza. What I didn't mention is the reason behind it. Our eldest daughter, son-in-law, and two precious granddaughters have moved in with us for a spell. For this Nana, that means lots and lots of cuddle time with the babies, and as a momma to our daughter, lots and lots of time to bond over mommy-type things. It also means being sensitive to the reasons that the kids are here. With the economy the way it is, churches are being hit hard. Loss of jobs means less people tithing, which means secondary pastor positions are becoming volunteer positions in smaller churches.

Which means that it is time to dig deep and find that mustard seed of faith.


While our kids wait to see what God has next for them, we're settling into an Amish-type style of living. Instead of a dawdy haus, we have a multi-generational house with a daddy on each floor. Instead of talks about horses & buggies, we're playing with My Little Ponies and Thomas the Train characters. Instead of dwelling on what-could've-been's, we're putting our faith in the what-is-to-come's.

And I for one, can't wait to see what happens next.

Bedroom #1 had to be re-sheetrocked after our toilet catastrophe of last summer.

Bedroom #2 had a moldy smell that disappeared once we removed the old carpet. And our teenage son. I'm holding out hope that he wasn't the cause of the smell. The case is still pending...

Bedroom #1 was painted a nice aqua color (it used to be bright red!) and a tan frieze carpet was laid.

The girls' room was painted a periwinkle blue with white accents.
 
Without instructions, it took a village to raise, I mean, erect the crib. Another reason to buy local...Help Hotlines!

Madison loves her new room!

Emmie could care less about her room...she was too busy sucking on blueberries through her fruit holder!

Poppa & Maddie having a midnight snack...literally.
In the meantime, I guess we'll make a few more memories.☺


Thursday, September 22, 2011

I Write the Songs that Make the Whole World Sing?

I have a talent that no one knows of.

But because I love ya, I'm going to share it with you.

I write bathroom jingles. In the bathroom.

Especially when the paint fumes get to be too thick.

Don't judge.

♫Deck the walls with lay'rs of sheetrock,
Fa la la la la, la la la la.
Don't forget to grab a paint smock,
Fa la la la la, la la la la.

Don we now our grungy apparel,
Fa la la, la la la, la la la.
Kill the mold and make it sterile,
Fa la la la la, la la la la.

Paint the Kiltz on the wall before us,
Fa la la la la, la la la la.
Attack the rot because we must.
Fa la la la la, la la la la.

Follow me in broad brush strokes,
Fa la la la la, la la la la.
Now you know this is no hoax,
Fa la la la la, la la la la.

Have a timeline, git 'er done,
Fa la la la la, la la la la.
If only this were halfway fun,
Fa la la la la, la la la la.

Off to Lowe's to buy a new toilet,
Fa la la la la, la la la la.
Then we'll sit and be able to enjoy it,
Fa la la la la, lala la la. ♫
Hey, I didn't say I was a good jingle writer!

You know, that's 2 minutes of your time that you're never getting back.☺


Monday, July 18, 2011

How to Take the Ugly Out of the Paneling

Photo Credit

Wood paneling. Just looking at the above picture makes me feel like a Keebler elf living in an old-growth hemlock. Fortunately, my paneling issue is not as severe as the above photo. But for me, any paneling is too much.

Our first home was 800 square feet of nothing but paneling. In. every. room. To say I have panel issues would be grossly understated.

Thankfully, getting rid of paneling doesn't have to cost a fortune. It doesn't require a carpenter who specializes in sheetrock and can be completed in a 24-hour period.

How great is that!?!

A couple of weeks ago, I started a new painting project. Our living room had been a dark orange-red, and I got bored. Then I went shopping. To Lowe's. Enough said.

I chose Cinnamon Sugar for the new color and loved it! The only problem was that we had one wall that had dark brown paneling on it. That end of the living room seemed dark, even though it was the wall that housed the entertainment center. I was hopeful that we would eventually sheetrock that wall, but after 9 years, my patience ran out.

Not to mention the remodeling funds.

New color on the walls
To paint a paneled wall, you'll need an oil-based primer and latex paint. If the paneling is shiny, you might want to take the shine off with a fine grit sandpaper.  Thankfully, the shine on my paneling disappeared about the same time that dark wood paneling went out of style.

Looks shiny, but that's the brief moment of sunshine we had peeking in.

Tape off any areas that you want to keep the primer off of. Make sure you throw an old sheet or tarp down on floor as oil-based primer is difficult to clean off the carpet. I used Kiltz Low-Odor primer. It dries in an hour and won't kill too many brain cells in the process. Using a throw-away paint brush (don't spend the big bucks on a nice brush because it will not make it out of this project alive),carefully paint along the ceiling, corner, and floor edges of a small area. Generously coat the brush with primer to paint down the panel grooves. You can use a roller for the smooth portions if you want, or just fill in with the brush. Because the primer dries so quickly, only work a small area at a time.

Make sure you pull the furniture out far enough to give yourself plenty of room to work. I had to work around cables, phone lines, and various wires since my Mister was "conveniently" at work!

Primer is messy, so have a clean-up plan ready for the little "oopsie's". I'm currently sporting a rather flattering speckled pattern over the top half of my body.

Trust me. It's flattering.

After the primer has dried for 1 hour, it's time to paint. Latex paint adheres very well to oil-based primer. I'm sure there's some sort of scientific reason for this, but I'm on summer break and don't really care what that reason is. I just know that it works very well.☺

If using a roller for the paint, use one that has a thick nap so that it will cover the grooves too. I used a brush along the edges, but only had to use it to touch up a few grooved spots. You may need to apply a second coat of paint after the first dries, but that will depend on your paint and the color.

The grooves are not so noticeable when they are the same color as the rest of the wall!


Clean up is easy; throw away the brush, toss the sheet in the laundry, and sit back and enjoy your new wall or room and wonder why you didn't do this sooner!

Monday, September 20, 2010

The New Kitchen Revealed!

While we were on our little mini-vacation, my Mister and I decided to check out an antique shop. My goal was to find some old rolling pins for the new kitchen, his goal was to just make it out with a little money left in his pocket.

But, we both liked this little guy. He's a craft project from the 1940's, made entirely out of seeds! And since it is from the 40's, I am quite sure that these seeds are not only organic, but also non-GMO seeds! How perfect is that?

New kitchen, new attitude, new memories.

First, a reminder of the former kitchen. Notice the soffits? Please notice the soffits and not the cluttered counters!

When this house was built (1969), there weren't as many gadgets and gizmo's for the kitchen, so this size was appropriate for getting the job done.

Enter 2010 and the modern pioneer chick. I like to bake my own bread and ferment things on the counter, but really, this was a fire alarm just waiting to sound off!

Because there was no pantry, we had food scattered all over the house, tucked in closets, under beds and in the garage~not to mention on top of the fridge!

That was then.

~~~~~

This is now.


We still have the tile backsplash to add, but right now, we're just happy to have a kitchen!


And the pantry problem?

Solved.


I cannot describe the joy I feel...


...to have all of the food...


...in one place!!!


See the drawers under the stovetop?

My cast iron pans finally have a home.


Remember the old doorway?


As you can see, I did find my rolling pins!


The problem now?

What to do with all that room!


Later this week, I'll share with you a technique for preserving your butcher block or wooden cutting boards. It's frugal, fun and makes the hands so soft!


Wednesday, September 1, 2010

Time for Flooring!


Now that our cabinets are installed, it's time to lay the ceramic flooring. We've never laid tile before, so this has been quite the adventure.

That's us, living on the edge.

Of sanity.

First, we needed to have a plan. Because our cabinets are a knotty hickory, and our walls are Sienna Red, we decided to go with a lighter floor color. In fact, we wanted our floor to match the ceiling since the ceilings are a standard height of 8 feet. It gives the illusion of a taller room, without making it seem like a cave.

Besides the tile, we also needed spacers, grout, mud, hardibacker board, screws, a trowel, and a lot of hours picking the Home Depot guys' brain.

To get a general idea of how the tile would look, we laid out several rows to decide the direction we wanted to go. I thought angled would be nice, but there would have been a lot of waste.

Trust me, at the end of a remodel, you can't afford to waste anything!

(The hardibacker board had already been screwed down to the sub-floor.)


With the pattern decided, my Mister needed to cut the non-conforming tiles.

The little rebels.

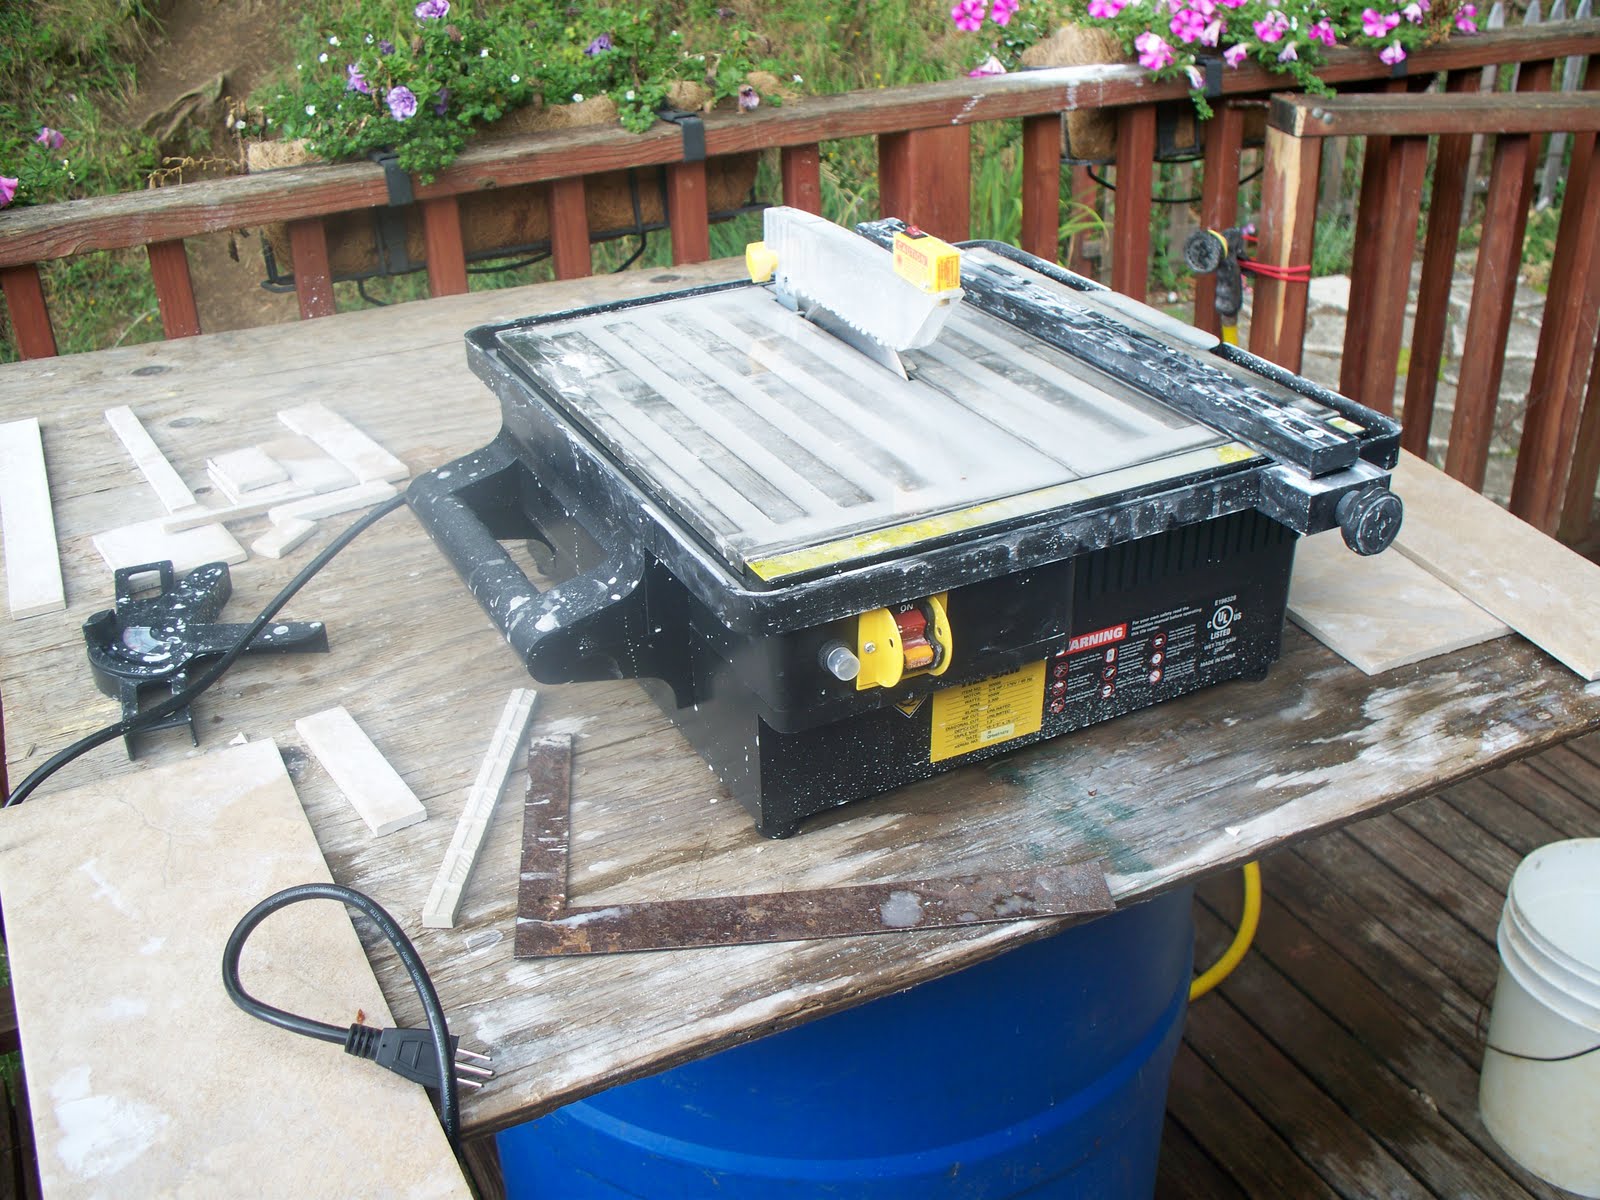
He needed a tile saw to do this project. This is only one of the many tools that he "needed".

I agreed. Cutting the tiles without the saw would've been a bad idea. The tile saw has water in the base that keeps the tile and blade from getting too hot.


You also need one of these to lift the 80 pound sacks of mud mix.

But not this one.

He's taken.


After the tiles were cut, it was time to mud them into place. This requires the perfect ratio of water to mix. It requires someone with a little know-how on mixing things.


It requires a steady hand that can hold both the hose and the drill at the same time.

"Just a little more water, honey...not too much...now you've gone and done it...this doesn't look like peanut butter...there's too much water...need to add more mix...oh, that's enough...awww, you didn't stop in time...gotta add more water...are you listening to me?"


I should have shut my big dumb mouth.


My Mister promoted me to Chief Mix Master.


The Home Depot expert told us that the mix needed to be of "peanut butter consistency". Well, that leaves the door wide open to interpretation. Depending on your peanut butter preference, it could be more of an Adam's-after-it-has-been-stirred consistency, or more like a partially-hydrogenated-starts-with-an-S-ends-with-an-ippy texture.

I opted for the Adam's.

Speaking of peanut butter...have you ever noticed the warning label on the back of the peanut butter jar? It says, "This product was made in facility that processes peanuts".

Really?

I wonder where soy is processed?

Just sayin'...

After you've pondered all of the important things in life, it's time to lay the mud. My Mister says it's like frosting a cake, but without the finger licking, I cannot agree with this one.

It's just not right.

The mud is globbed onto the floor, spread out with the flat side of the trowel, then gone over with the toothed side. And if you're a perfectionist, you'll make sure every single one of those teeth marks are perfectly straight.


Here's why it's important for the mix to be of the right consistency; too little water and the mud dries too quickly, popping up the tiles in the process. If it's too wet, the mud oozes out from underneath and the tiles won't be level.

Or so I've heard.

As the tiles were being set into the mud, spacers were used to keep them evenly spaced.


I wasn't allowed to lay the tile. It would've "hurt your back and knees".

Isn't that thoughtful of my Mister to be thinking of my back and knees?

I took it as a dare.

As soon as my beloved left the room, I grabbed the trowel.

This is my tile.


I think it may just be the nicest one of the bunch.

But we'll just keep that our little secret, shall we?

Thursday, August 26, 2010

Kitchen Updates!


'Twas the night before cabinets,
and all through the house,
anticipation was building,
mainly from the spouse.


The lighting was mounted,
from the ceiling with glee,
so people could view,
our new hickory.


The children were used,
to clean up the mess,
in hopes that tomorrow,
the dirt would be less.


The hubby, he bought,
every tool on the shelf,
He said we needed them,
as he mumbled to himself.


The glowing pantry light,
with its brightness so new,
gave the old bathroom window,
something to do.


The glare from above,
gave the room such a glow,
I had to turn it off,
to see anything below.


When my eyes finally adjusted,
and my heart-rate slowed down,
I decided these walls,
would go great with some brown.


With the kitchen enlarged,
and because I am able,
We removed the 12 feet,
that used to be our table.


And now as we rest,
and wait as we must,
I'll anticipate the new cabinets,
and write my name in the dust.


To be continued...

Not the poem.

Sorry for that.

It's been a long summer.