Thursday, September 30, 2010

Zucchini, Tomato & Corn Casserole


I wish I could come up with a better name for this casserole as it deserves only the very best. And this is coming from a girl who is not really a fan of zucchini. How about "The End of Summer Casserole"?

Sometimes, I can be persuaded to eat the summer squash and not think about my tortuous childhood. I spent HOURS sitting at the table, after everyone else was finished, dishes were done and "Happy Days" was on the television before my dad would take pity on me and snatch the wretched veggie away from me.

Of course, my mom didn't know.

So why would I make anything that has zucchini in it? Or for that matter, grow it?

Because this is good.

Good enough to make me forget how much I dislike zucchini. (Besides, the zucchini plant is indestructible and makes me look like I know what I'm doing in the garden!)

~The Players~

1 lb. zucchini, unpeeled and chopped
1/2 sweet onion, chopped
2 cloves garlic, minced
2 eggs, beaten
2 cups sweet corn
1 cup tomatoes, chopped 
 1 cup shredded mozzarella cheese
1/4 t. sea salt
1/4 t. pepper
paprika


Butter a 9x13" dish.


Mix corn, 3/4 cup cheese, eggs, onion, garlic, salt & pepper. Set aside.


Steam zucchini until tender. Add zucchini to the corn mixture.


Gently stir in the tomatoes. Pour mixture into buttered dish. Top with remaining cheese. Sprinkle with paprika. Bake in a 350F. preheated oven for 45 minutes. Let stand for 5 minutes before serving.


You may have noticed, because you are smart and nothing gets by you, that there are no tomatoes in this dish. That's because I got side-tracked.

I'll share that tomorrow!

Enjoy!

Monday, September 27, 2010

Dill Pickles 101

 Anyone who has ever been to my house during the summer, has had to learn alternative routes to entering and exiting the building. During canning season, every table, shelf, counter and chair is covered with row after row of pickles.

I should probably make guests sign accident wavers.

Because that is just waiting to happen.

This year, between the kitchen remodel and the bizarre weather, I was unable to can all of the things that I would normally can. And it has bothered me. Alot.

Today, I took my girls to Sauvie Island to pick up some apples, pumpkins and winter squash. I had visions of applesauce, apple butter, some yummy pies and baked Danish squash with plenty of butter and brown sugar that we would get be able to enjoy over the winter. I decided that that would have to be enough.

I had a plan. And I was not going to detour from it, no matter how many tantalizing late-season fruits and vegetables there might be or how much my girls begged.

I am weak.

Besides coming home with the apples, pumpkins and Danish, we also brought home cucumbers, pears, corn on the cob, sweet onions and chrysanthemums. 

I'd better start making a path through our family room again. 

This recipe is so easy. It does use vinegar, but doesn't require a canner. To put up 25 lbs. of pickles, it took me an hour. Easy.


Wash the cucumbers.


To make the brine, mix 1 quart of apple cider vinegar, 3 quarts of water, and 1 cup of pickling/canning salt together in a large pot. Bring to boil, then turn down to simmer. Do not let it continue to boil.


In each quart jar, add 1-2 dill heads, 2 cloves of peeled garlic, 1/2 tsp. mixed pickling spices, and 1/8 tsp. alum powder. You can find the pickling spices and alum in the spice section of the grocery store.


Now the easy part. Stuff the jars with cucumbers! It is your choice whether to use whole, speared or sliced cucumbers. I like to mix them up. Make sure that you don't over-stuff the jars though.


Ladle the hot brine into the jars, covering all of the cucumbers.


This is my new apron. I got it at the farm.

I told you~I am weak.

Apply the flat, hot lids and screw them down fairly tight.

Turn the jars upside-down and leave for 24 hours. The hot brine will seal the lids.


After 24 hours, turn the jars right side up and check to see if the jars are sealed. If not, open the jar, reheat the brine and reseal.

Leave the jars alone for 2 weeks, then move them to where ever it is that you store your canned goods.

The pickles can be eaten after 5 days, but they will still be "working", so it's best to leave them alone for the full 2 weeks.

Here's what else I found...


...and wouldn't you know it, our peppers are starting to ripen...all at once! These are chopped, ready to be bagged for the freezer.

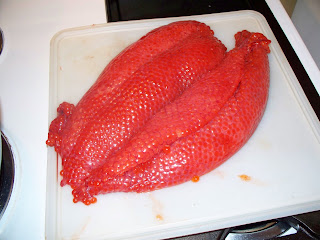
And remember the salmon roe?  It's going in the freezer too!

Now, I am officially grounding myself until all of the boxes of produce are canned, frozen, buttered and dried.

Unless I get weak again.

Hey, it could happen.


Sunday, September 26, 2010

MPM 9/27/10


Today was a big day in our household. No, nobody got hurt, or sick, no one got engaged or announced a new baby, and no, we're not moving or changing careers.

We bought a new coffeepot.

No more Mr. Coffeepot for us. Nope. After 23 years, we've moved on. There's a new pot in town. It's the electric percolator. Now we can have campfire coffee, which should win medals for how marvelous it is, during any old season.

And we don't have to light a fire to brew it.

Perfection.

I'm not sure why I am telling you about the new coffeepot, except to say that the weather has turned back to typical Washington weather. The weatherman calls it, "partly cloudy with a chance of sun-breaks; rain likely".

Excuse me Mr. Weatherman. Just tell us it's raining. And that we only have a 5-10% chance of seeing the sun between now and July 5th. We can handle the truth. We live here on purpose.

Besides a cup, or 8, of hot coffee, I'm going to pull out the big soup pot and make some chowder, chili, and stock from the chickens we need to butcher. I'm also making a trip, which will probably be the last one of the year, to Sauvie Island to pick up some apples, sugar pie pumpkins and some winter squashes. Have I mentioned how much I love fall?

Here's what's on the menu this week...

~Breakfasts~

Speltcakes w/ sour cream and homemade jam
Scrambled eggs & elk sausage
Soaked Oatmeal w/ blueberries

~Lunch~

Mini pizzas on corn tortillas (pizza sauce, fresh basil, raw cheddar, nitrite-free salami)
Homemade tomato/basil soup (from last week), sourdough bread
Corndog muffins, sliced apples w/ yogurt dip
Leftover Potato/Corn Chowder
Chili (leftovers) Nachos
Egg salad sandwiches on sourdough

~Dinner~

Crockpot Salsa Chicken, brown rice (from last week)
Creamed Swiss chard, Salmon patties, Bruschetta on sourdough
Potato/Corn Chowder, Cornbread
Minestrone soup

~Desserts~

Cranberry Apple Crisp (Recipe this week!)
Upside-down Pear Gingerbread w/ whipped cream

Visit The Organizing Junkie for Menu Plan Mondays!


Friday, September 24, 2010

How to Seal Butcher Block and Wooden Cutting Boards

Before my new butcher block counter entered my life, I used mineral oil to seal my wooden cutting boards.

Please forgive me, I knew not what I had done.

According to our cabinet guy, Lee, I was ruining my cutting boards. They were sealed from the yucky stuff, but they were warped or splintering apart. That's because butcher block/cutting boards are put together with multiple pieces of wood and wood glue. The mineral oil is too "liquidy" and not only coats the top of the board, but also seeps into it. Good, right?

Well, it seems that too much of something is not always a good thing. The mineral oil goes down deep, right into the glue, causing the glue to be less "gluey". (I know I'm using technical terms here, but try to keep up.) Less glue means less sticking power, which means wood pieces start to separate.

If you got that, then you're one up on me.

I'm a kinesthetic learner.

When making this, use a saucepan that you will not ever use for food again. Look at the Goodwill or garage sales to find a good "throw-away" pan. But then, don't throw it away!


You will also need an expired credit card or junk mail card. I found an empty Starbucks card.

Yes, I cried to find it was empty, but that's not relevant to sealing butcher block!


In the saucepan, mix 1/4 cup chopped Paraffin wax with 1/4 cup mineral oil.


Heat on low, until just melted.


Pour a small amount onto block or board. Using your hand, smear the melted wax over a small area.

Make sure that the wax is not too hot first.


Using the credit card, scrape the excess wax off of the block/board. Put the excess back into the saucepan to reuse.


Embrace your inner child and write your name or cute little squiggles.

But remember to remove your rings first.

Don't ask me how I know that.


Repeat about every other month to keep your cutting boards healthy and your butcher block looking nice.


I think this butcher block has some homemade sourdough bread in its future!

Thursday, September 23, 2010

Salmon~It's What's For Dinner

One of the reasons we live in the Pacific Northwest is our close proximity to the ocean. Even though we LOVE the mountains, it would be very difficult to live in a land-locked state and not have access to fresh seafood year-round.

And when I say fresh, I mean FRESH. Often times you can buy fish right off of the fishermen's boats as they are coming back to the docks. And sometimes, it is quite a "deal". We just bought about 100 lbs. of fresh caught salmon. When all of the math was done, it ended up costing us $1.12/lb.

Did we just rob a land-hungry, unsuspecting fisherman?

I just priced the same fish at our local grocery store. It was on sale for $12.99/lb. 

So, who are the thieves? 
~~~~~~

We needed to process our fish fairly quickly, so we decided to freeze some and can the rest. First, my Mister filleted the fish to make them easier to handle. 

The thickest part of the fish became roasts. The tail end, and strips below the ribcage, without the bones, were made into smaller pieces for fish & chips. The meat that was the least attractive was canner-bound. 

To skin the salmon, my Mister slid a very sharp knife between the skin and the meat. The key word is "sharp". It is not a word that I recognized.


These are our roasts, waiting to be packaged.


See how clean the skin is? That's because of the sharp knife.

That I do not have.


To can the salmon, we stuffed skinless pieces into pint-sized jars, about 1/2" from the top of the jar. Then we placed the hot lids on top and screwed the rings down tight. Because they were going into a pressure canner, the jars were new. When canning fish, we only reuse the fish jars twice, then they end up in the water-bath only section. Pressure canning weakens the glass and breakage is more likely to occur after a couple of uses.

Our pressure canners are stackable, so we were able to fit 14 into one, and 16 into the other.

Boy, do I love that!

Here's how to can fish...

Place the jars into the canner, then add 2-3 quarts of hot water. Place the canner lids on and turn on the heat. We used our propane cookstove, so we heated the canner up slowly. When the steam is coming out of the vent tube at a steady pace, place the cap on it and let the pressure build up to 10 lbs.


You will need to adjust your heat regularly. Don't be alarmed if the pressure hits 15 lbs., just turn down the heat a little. Once you've reached 10 lbs., set the time for 110 minutes.


When the time goes off, turn off the heat and let the canner sit, undisturbed until the pressure gauge points to 0.

There are no exceptions to this rule. EVER.

After the gauge reads zero, remove the cap to let any leftover steam escape before removing the lid.

Carefully remove the jars and set them on a covered table. Put a bathtowel over the top and let them cool overnnight.


Make sure that you label the jars! This is especially important if you can more than one kind of fish!

My kids had a very expensive salmon-fish sandwich last year.


We were fortunate enough to discover egg sacks in a couple of the fish.

I found a recipe and this became salmon "caviar".


I wasn't sure that anybody was going to eat this, but we had 6 out of the 8 of us, give it a thumbs-up!

Not bad for $1.12 a pound!

Monday, September 20, 2010

Oatmeal Buttermilk Cinnamon Pancakes


These could've been my claim to fame.

Except for the little fact that this is not my recipe.

Because I am a good person, and not bitter at all about somebody else coming up with yet another wonderful recipe that I can't seem to think up in my...

Sorry, I got a little lost there for a minute.

Let me start again...

*Ahem*

These pancakes are amazing! They are easy to digest, moist, cook quickly, and most importantly, are delicious.

And the recipe belongs to Chef Shane Kelly. I want her to adopt me so I can have these every morning. There may be a problem with that though. Besides not having a clue who I am, she may be younger than me.

Would that be too weird?
~~~~~

The Players

2 cups rolled oats
3 cups buttermilk
1/2 cup whole wheat
1/2 cup all-purpose flour
2 Tb. Sucanat
1/2 t. baking powder
1/2 t. baking soda
1 t. cinnamon
1/2 t. sea salt
2 large, free-range, organic eggs, lightly beaten
4 Tb. unsalted butter, melted and cooled
butter for the griddle

Stir oats into 2 cups buttermilk in a medium bowl and let stand, overnight, covered in the fridge.

In the morning, whisk together the flours, Sucanat, baking powder, baking soda, cinnamon, and sea salt until combined well. In the oat/buttermilk mixture, stir in 1 cup buttermilk, eggs and melted butter until well combined. Stir in the dry ingredients until just blended.

Brush a large skillet or griddle with butter and heat over medium heat. Pour batter by 1/4 cup measures and cook pancakes 1-2 minutes on each side, or until golden, brushing the griddle with more butter as needed.


Keep warm until served. Serve with pure maple syrup or a mixture of syrup and pureed fruit. And don't forget plenty of cultured butter!

The New Kitchen Revealed!

While we were on our little mini-vacation, my Mister and I decided to check out an antique shop. My goal was to find some old rolling pins for the new kitchen, his goal was to just make it out with a little money left in his pocket.

But, we both liked this little guy. He's a craft project from the 1940's, made entirely out of seeds! And since it is from the 40's, I am quite sure that these seeds are not only organic, but also non-GMO seeds! How perfect is that?

New kitchen, new attitude, new memories.

First, a reminder of the former kitchen. Notice the soffits? Please notice the soffits and not the cluttered counters!

When this house was built (1969), there weren't as many gadgets and gizmo's for the kitchen, so this size was appropriate for getting the job done.

Enter 2010 and the modern pioneer chick. I like to bake my own bread and ferment things on the counter, but really, this was a fire alarm just waiting to sound off!

Because there was no pantry, we had food scattered all over the house, tucked in closets, under beds and in the garage~not to mention on top of the fridge!

That was then.

~~~~~

This is now.


We still have the tile backsplash to add, but right now, we're just happy to have a kitchen!


And the pantry problem?

Solved.


I cannot describe the joy I feel...


...to have all of the food...


...in one place!!!


See the drawers under the stovetop?

My cast iron pans finally have a home.


Remember the old doorway?


As you can see, I did find my rolling pins!


The problem now?

What to do with all that room!


Later this week, I'll share with you a technique for preserving your butcher block or wooden cutting boards. It's frugal, fun and makes the hands so soft!